Wednesday, December 14, 2011

12 Days of Goodies - Day 6: Turtle Cookies

I love turtles - the combination of caramel, pecans, and chocolate gets me every time. So when I saw a recipe from Betty Crocker called Caramel-Fudge Turtle Cookies, I knew it was one I wanted on my Christmas cookie list. The original recipe is here, but I changed it up to use more of a chocolate chip cookie dough base (minus the chocolate chips) and instead of fudge ice cream topping, I used melted chocolate chips because I thought the cookies would hold up and and travel better that way. I also turned it into more of a thumbprint cookie because I thought dipping half the cookie in caramel would also be too messy. The result was delicious, and I hope you give them a try!

Turtle Cookies
1/2 c. softened butter
1 c. white sugar
1 egg
1 tsp. vanilla
1/2 tsp. salt
1/2 tsp. soda
2 c. flour
12 caramels
1 T. milk
1/2 c. semi-sweet chocolate chips
1/4 c. chopped pecans
1. Preheat oven to 350 degrees and line a baking sheet with parchment paper.
2. Cream butter and sugar on med.-high speed until light and fluffy, 2 minutes.
3. Scrape down bowl, add egg, vanilla, soda, and salt and beat again for 3 minutes.
4. Stir in flour until just combined. Drop by Tbls. onto prepared baking sheet and bake for 7 minutes.
5. Take out of the oven and press your thumb into the center of each cookie, and return to oven for 3-4 minutes. Remove from the oven and re-press your thumb to make an indentation, and allow cookies to cool.
6. Melt caramels and milk in microwave for approximately 1 minute, and stir to combine. Using a 1/4 tsp., spoon caramel into cookie indents, and use the back of the spoon to spread around.
7. Melt chocolate chips for appr. 1 minute, and use a 1/2 tsp. to spoon over caramel and spread slightly. Sprinkle a few chopped pecans on each and allow to cool. Eat up!


On a side note: The boys have been playing so nicely together lately, and sometimes it makes my heart so full of love I can literally feel it in my chest. It's the most wonderful feeling! We're gearing up for Christmas, and I think we'll celebrate over this coming weekend because we'll be heading to our families for Christmas Eve and Christmas Day. I can't wait to see how much fun the boys have - Asher is so excited, and Aiden gets excited just because Asher is. All I'm hoping for is good weather and healthy boys! I also finally got Christmas cards out this year after wanting to for four years now - I patted myself on the back already. ;)
The family photo we used for our Christmas card.
The other photo we used - I love Asher's smile in this one,
and that Aiden's reaching for him :)
We didn't use this one, but I think it's hilarious
Mr. Sweet Face

Tuesday, December 13, 2011

12 Days of Goodies - Day 5: Chocolate-Caramel Snowballs

Chocolate cookie dough, wrapped around caramel Hershey's kisses, rolled in powdered sugar? Yes, please. Hershey's has really great recipes - in fact, my favorite chocolate cake and chocolate frosting recipes are from their online recipe page (see here for the recipes). The original recipe calls for finely chopped almonds in the dough, but I didn't have any on hand so I omitted them. Also, I used caramel kisses instead of plain - my only note would be to freeze them the day before you  bake with them. I had a few problems with caramel leaking out of the cookies, but they still turned out well and looked pretty.
Aside from looking and tasting delicious, another nice thing is that since with this cookie there are a few extra steps (i.e. covering the kisses in dough, and rolling them in powdered sugar after baking), it's nice that the recipe itself is a doctored sugar cookie mix! I love having a few of these types of recipes on hand. This one could be changed up easily just by using different flavorings and different types of Hershey's kisses. Orange extract with chocolate-almond kisses would be good, or the cherry filled kisses with vanilla extract would be delicious, too -  endless possibilities!
Chocolate-Caramel Snowballs
1 pkg. (16 oz) sugar cookie mix
1/2 c. butter, melted
1 egg
1/4 c. cocoa powder
1/4 c. flour
1 tsp. almond extract
Caramel Hershey kisses - I used about 30, I think
Powdered sugar for rolling
1. Preheat oven to 375 degrees, and line a baking sheet with parchment paper.
2. Mix first six ingredients in a large bowl until thoroughly combined.
3. Scoop dough by Tbls. and form around a Hershey kiss.
4. Place on prepared baking sheet, and bake for 8-10 minutes.
5. Allow to cool for 10 minutes, then drop 3-4 cookies at a time in the powdered sugar and toss lightly to coat. Place on baking rack to cool completely. You can douse them in powdered sugar again before you serve them if you want to perfect their powdered sugar appearance and get them looking snowy white again.

You can see a tiny bit of the caramel on the bottom, right hand cookie.
The center of these is nice and chewy from the chocolate and caramel,
while the outside has a more tender crumb texture.

Monday, December 12, 2011

12 Days of Goodies - Day 4: Coconut Cake

For my birthday, my parents got me "The Cake Mix Doctor Returns" and I've been dying to try out one of the cakes. I decided to go with the Coconut Refrigerator Cake for two reasons: 1) I've wanted to make a coconut cake of some kind for about a year now, but haven't found an occasion to do it, and 2) It looked so pretty and festive in the book.
The recipe itself is simple, both for the cake and frosting. However, I definitely ran into problems with the frosting because it would not stay on the cake! It was really frustrating and time consuming to get it to look decent. BUT, don't worry, I have some suggestions below as to alternatives which should make it much easier next time. The wonderful thing about this cake is that it's a refrigerator cake, so you can make it ahead of time and it only gets better as it sits in the fridge. I sliced a piece and then took the rest over to my old work pals as part of their Christmas goodies. So far, the two bites Asher and I have had were very well received.
This. Cake. Is. Delicious. I will definitely be making it again!

Coconut Refrigerator Cake
Cake
1 pkg. white cake mix
1 c. milk
1/2 c. cream of coconut (can be found by the mixed drink ingredients; be sure to stir it well first)
3 eggs
1. Preheat oven to 350 degrees. Grease and flour 3 9-inch cake pans.
2. Put all ingredients in mixing bowl and mix on low speed for 30 seconds.
3. Scrape down sides of bowl and beat batter on medium speed for 1 1/2 minutes.
4. Divide batter evenly in cake pans - approximately 1 1/2 c. each. Bake for 18-23 minutes, or until light golden brown, and the top springs back when lightly pressed with your finger.
5. Allow to cool in pans for 5 minutes, then run a knife around the edges and turn cakes out to cool completely on wire racks.
Frosting
2 c. reduced fat sour cream
1 3/4 c. white sugar
8 oz. frozen whipped topping, thawed
3 1/2-4 c. sweetened, flaked coconut
1. Place sour cream and sugar in mixing bowl and beat on low for 1 1/2 minutes. Scrape down bowl and beat on medium until the sugar has dissolved - 2 more minutes.
2. Add whipped topping and beat on low until well blended.
3. Stir in 3 c. coconut, and refrigerate at least 10 minutes
Assembly
1. After cakes have cooled, slice each in half horizontally using a serrated knife - you'll have six layers. Brush layers lightly with cream of coconut, if desired. (I did this for three of the six layers.)
2. Put four strips of waxed paper forming a square and set the first cake layer on it. (This prevents frosting from getting your platter messy). Top cake with a heaping 2/3 c. frosting. Place another layer on, and repeat layering cake and frosting until the top layer is on.
3. Here is where I went wrong, and now you won't. You can use the rest of the frosting to frost the top and sides of the cake. If so, here are my tips: 1) Start on the top and put frosting on, and slowly work it to the edges and down the sides. It will slide off onto your waxed paper. 2) Do not try to keep putting more frosting on the sides. You will spend forever trying to do this. Whatever sticks with the first application is all that will stick. I mistakenly thought if I refrigerated it and then tried to put more on it would work . . . it didn't. So, frost the top and sides and stick it int he fridge. 3) After it sits in the fridge for an hour or so, take it out and sprinkle the top and press the sides with the remaining 1 c. of coconut. This helps cover any imperfections the frosting didn't cover. I think I would do it this way next time.
Or
If you don't want to mess with that process, here's an alternative: Make half of the frosting recipe and just use it as filling between the layers. It's way too delicious to not use it at all. For the top and sides, you can then use a cream cheese frosting, or a coconut buttercream - I think either would be yummy.

If you learn from my mistakes, you shouldn't have problems. Or maybe your frosting will stick nicely to your cake and not run at all . . . According to the recipe, she adapted this frosting because in her previous recipe the frosting wouldn't stick and kept dripping down the sides . . . Hmmm, that's still happening to me with this one, but maybe you'll have more success. Like I said, I'll definitely be trying this one again. SO GOOD.

*Don't forget to gently pull your waxed paper from the edges of your cake before serving!
Look at that mess!!!
Drippy drippage.
Ta-da! Fixed it - and thank goodness I used the waxed paper trick or it would have been much harder to clean up.
Looks pretty nice, now, right?
It cuts beautifully, too.
12 layers of cake and frosting . . . what could be bad about that?!
It really is a delicious cake.

Sunday, December 11, 2011

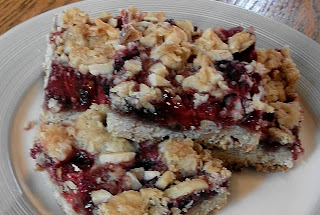
12 Days of Goodies - Day 3: Raspberry-Strawberry Almond Bars

As much as I love chocolate, for the holidays it's always good to include a treat that has some type of fruit. I saw these bars here and figured I can't go wrong with Ms. Betty Crocker. I made a few changes to the recipe because it says to bake it in a 9 in. square pan, but I knew that wouldn't be large enough for my needs. So I doubled the recipe, baked it in a 10x15 pan, and used half strawberry and half raspberry for the preserves and fruit required. I was pretty happy with the results - they're chewy and sweet, but slightly tart from the fruit. It was a really nice combination, and a recipe I'll definitely keep in my repertoire!

Raspberry-Strawberry Almond Bars
3 c. flour
3 c. oatmeal
1 tsp. salt
1 1/2 c. brown sugar
1 1/2 c. cold butter
2 eggs
3/4 c. each strawberry jam and raspberry jam
1 c. each strawberries and raspberries (I used frozen - I thawed and drained them)
1 c. slivered almonds, chopped
1. Preheat oven to 375 degrees and grease a 10x15 pan.
2. Mix oats, flour, brown sugar, and salt in a large bowl. Cut in butter until mixture looks like coarse crumbs. Reserve 2 cups for topping. 
3. Stir in eggs to the remaining mixture in bowl until moistened. Press into bottom of pan.
4. Stir jams together, then spread over the crust. Sprinkle with the fruit.
5. Stir almonds into reserved crumb mixture, then sprinkle evenly over the fruit. Bake for 30-35 minutes, or until light golden brown. Allow to cool before cutting into bars.


Saturday, December 10, 2011

12 Days of Goodies - Day 2: Chewy Chocolate Meringues

I've been wanting to try meringue cookies for quite a while now, and I stumbled on this recipe over here, and decided to give it a go. I'm so happy I did - you only need 4 ingredients, and they're light and delicious! They have a light, chocolatey flavor, and they almost taste a little like toasted marshmallows. SO GOOD. Don't let the "meringue" part scare you - it's not hard. If you want to dress them up a little more, you could drizzle some melted chocolate over them once they've cooled, but I think they're cute as-is.

Chewy Chocolate Meringues
1/2 c. egg whites (3-4)
1 c. white sugar
2 1/2 Tbls. cocoa powder
2 ounces dark chocolate, finely chopped
1. Preheat oven to 350 degrees, and line a baking sheet with parchment paper.
2. Set a heat-proof bowl over a pan of simmering water (don't let the water touch the bowl), and whisk sugar and egg whites until the sugar is dissolved. You should be able to rub it between your fingers and not feel any graininess.
3. Transfer mixture to the bowl of your mixer and mix on high with whisk attachment until stiff and glossy - about 5 minutes.
4. Sprinkle cocoa and chocolate over, and gently fold in with a spatula.
5. Drop by tablespoon onto prepared sheet and bake for 16-18 minutes, turning once. Allow to cool and eat up. They're addictive, and it's easy to eat a lot of them because they're so light!


I love Christmas-time because it gives me an excuse to try new recipes, and bake up some that are tried and true. What are some of your favorite Christmas treats?

Friday, December 09, 2011

12 Days of Goodies - Day 1: Grandma's PB Cornflake Bars

In my opinion, any recipe that has "Grandma" in it is bound to be delicious. This one is no exception. My Grandma used to make these bars for us when we'd come visit, and I can remember hovering around as she poured them into the pan to cool; my mom and I always picked at the edges, and I inevitably burned my mouth every time because they're too good to let sit until they cool. I think they're actually supposed to have melted chocolate chips on top, but they never lasted long enough for that and nobody missed it! These bars are nostalgia in a pan for me, and even though Grandma's gone, when I make these I remember her as clearly as if I saw her today. This recipe holds wonderful memories for me, and I hope one day my grandkids will enjoy these bars as much as I did/do. But, in the meantime I hope you enjoy them!

Grandma's Peanut Butter Cornflake Bars
1 c. white sugar
1 c. light corn syrup
1 c. peanut butter
1/2 c. butter or margerine
9 c. cornflakes
1. Grease a 9x13 pan. Pour cornflakes into a large mixing bowl and set aside.
2. Place first four ingredients in a saucepan and bring to boil over medium heat. Boil 1 minute, stirring constantly, and remove from heat.
3. Pour mixture over cereal, stir until thoroughly combined, and press firmly into prepared pan. Allow to cool (if you can!) and eat up!

On a Side Note: Well, we got our Christmas tree set up and decorated . . . Turns out I underestimated. Instead of not being able to have decorations on the bottom foot of the tree, it's more like the bottom 2 feet. Aiden is alllllll over it. It's pretty funny, actually. Asher still gets so excited when we turn it on each night - he is so excited about Christmas this year! Also, when Aiden cries, he used to say "Aiden's sad" or "Aiden's crying," but I guess he decided to make up his own word. Now, he says "Aiden's sadding." I get a kick out of it every time. :)
Digging in the tree for ornaments . . . 
And eating the decorations.
I'm not sure if he was taking these off or putting them on . . .
Oh yeah, he was taking them off to throw the "ball" and "play"
the French horn, haha.

Thursday, December 01, 2011

A Salty Sweet Treat to End Your Week

I was introduced to the website Pinterest not too long ago, and now I'm totally hooked! On the website you create "boards" that basically serve as places to keep all those things you find on the internet, but aren't sure how to remember them . . . That's why our "Favorites" bar is full of recipes I want to try - I think it's kind of annoying for Dusty to filter through them all to find the few he's put there. :) So now when I find a recipe, craft idea, new workout, DIY project, cute outfit - or ANYthing, I can "pin it" to one of my boards. The other cool thing is that you can see what everyone else is "pinning," too. And that, my friends, is where I found this recipe. A chocolate chip cookie dough base with pretzels, PB chips, and milk chocolate chips . . . they were really yummy! The original recipe can be found here, but since she said her cookies didn't spread much, I decided to use a different base.

Pretzel Cookies with Chocolate and PB Chips
1/2 c. melted butter
1/2 c. softened butter
1 c. brown sugar
2/3 c. white sugar
2 eggs
2 tsp. vanilla
1 tsp. baking soda
1/2 tsp. salt
3 1/2 c. flour
1 c. roughly chopped pretzels
1 c. PB chips
1 1/2 - 2 c. milk chocolate chips
1. Preheat oven to 350 degrees and line a baking sheet with parchment paper.
2. Beat melted and softened butter to combine, then add sugars and beat until light and fluffy, 2-3 minutes.
3. Add vanilla, eggs, soda, and salt, and beat another 2-3 minutes.
4. Stir in flour until almost combined, then with mixer running, pour in pretzels and both chips until just combined.
5. Drop dough by tablespoon onto prepared cookie sheet and bake for 12-15 minutes, or until light golden brown. Allow to cool, and enjoy!
The pretzels stay surprising crunchy in the cookies for a couple days, and it's a nice change from regular chocolate chip cookies. The dough is also highly addictive, so beware! I'm not suggesting you eat it, with the raw eggs and all, but I can't ever help myself . . . I think pregnancy has been the hardest 18-20 months of my life since I couldn't eat the dough and make cookies out of it. ;) If you're looking for a safe alternative, just substitute about 1/2 c. of milk for the eggs and have at it!

Highly addictive - I'm warning you again!
You can see mine are a little underdone in the middles, but that's
how I like them - leave yours in a few minutes longer if you don't.
Deliciousness.
On a Side Note: IT'S OFFICIALLY DECEMBER!!! The Christmas season is upon us, and I love  it! We picked out our Christmas tree yesterday and are picking it up on Saturday - Asher is soooo excited. He loves Christmas trees, and we can't wait to decorate it with him. Aiden (aka Mr. Mischief) is a different story . . . we'll see how he does with it - we might not be able to have any lights or decorations on the bottom foot of the tree. :) I'll try to post some pics after it's all done!