Showing posts with label Birthday. Show all posts

Tuesday, September 11, 2012

A Roarin' Good Cake

When I asked our now 3-yr-old what kind of cake he wanted for his 3rd birthday, I was not expecting him to say, "A dragon!" As I tried to hide my dismay behind smiles of excitement (how on earth was I going to make a dragon of all things?!), my mind immediately went to the internet.

You can find anything on the internet these days, and sure enough I found this tutorial for how to construct a dragon cake! The design was so easy to follow as far as how to construct the dragon out of cake, and all you need are two round (8 or 9 inch) cakes.

The absolute best thing about this cake was how much Asher loved it. I mean he loved it! He kept going upstairs to look at it and would call down, saying, "Mommy, Daddy, come look at my dragon cake!" Talk about making a mom feel good. :)

I used my favorite doctored up white cake recipe, and added sprinkles to it because Asher loves sprinkles. I also used my go-to buttercream frosting and made 1 1/2 times a regular batch just to make sure I had enough.

The original tutorial used different kinds of candy than I did to make the spikes, talons, etc. and you can certainly use whatever you think will work best.

Supplies
2 8-or-9-inch cakes
3-4 cups buttercream frosting, tinted the colors you like (I did blue and green)
Starburst candy
Chewy Spree
1 large marshmallow
2 fruit roll-ups (I used the tie-dye kind)
4 chocolate chips
2 skewers
candles (I found those crazy squiggle ones at Hy-Vee)
a large cutting board, or some other flat surface to use as the cake base

1. Cut the dragon out using the tutorial link above.
2. Secure each piece to your cake base using a dollop of frosting, and also secure the cake pieces together using frosting (this helps the pieces from separating after you've finished frosting it).
3. To frost the cake you can either slather the frosting all over and then use some type of round bottle cap and make indentations for scales, or you can do what I did. Fill a plastic baggy with frosting and snip off the end. Pipe a line of dots (about 1/4-1/2 inch big) straight across the top of the body. Use a spoon and lightly press into one dot at a time and pull down gently. Pipe the next row of dots close enough to the first to not see cake in between (I alternated my blue and green colors). Continue doing this until the entire dragon is covered with frosting. *Don't be discouraged if it doesn't look perfect - some of those angles are tough, and some of those spaces are hard to get to with piping. The end result will still look good!
4. For the spikes along the spine, slightly flatten the Starburst and cut in half diagonally into triangles. Insert each triangle into the dragon spine and down the tail.
5. Use Sprees and insert them vertically into the dragon's feet.
6. Snip the marshmallow in half horizontally and press each half onto the face for eyes. You can either use black icing to make the pupils, or insert a chocolate chip into each so the round part is facing out.
7. Use 2 chocolate chips to form the nostrils.
8. Insert candles into the snout to look like fire.
9. Wrap fruit roll-ups around each skewer and stick it to itself. Then insert each skewer into the cake to make the wings - you may need to cut the skewers to fit (you can scallop the edges of the fruit roll-ups just by using a scissors).


Look out, he's breathing fire!


It looked good, but does it taste good . . . 
The official verdict was a resounding, "YES!" :)
Hugs and cookies,

Amanda

Tuesday, August 28, 2012

Candy Lover's Cake

Asher's 3rd birthday came and went, and I still can't believe he's 3! He had an absolute blast with his birthday - he was so excited about everything: cake, candles, presents, singing, seeing family, everything. In fact, today he said, "I need some more birthday, Mommy." Made me feel good to know that he really enjoyed everything about it.

For my little sweetie's actual birthday, I knew I wanted to make a cake that didn't require any fancy decorating by me, since I had already made a dinosaur birthday cake when we had family down to celebrate over the weekend (a post on that cake to come!). This cake couldn't have been easier as far as decorating goes, and the cake and frosting recipes are easy, too.

I used my favorite Hershey's Perfectly Chocolate Chocolate Cake and Perfectly Chocolate Chocolate Frosting recipes because you really can't go wrong with either - they turn out every time. I love them.

And, since Asher loves Oreos, I decided to use them in the filling between the cake layers:

Oreo Cream Filling (original recipe can be found here)
8 oz. container whipped topping
4 oz. softened cream cheese
7 oz. jar marshmallow cream
12 oreo cookies, crushed
1. Combine first three ingredients until thoroughly combined. Refrigerate about 1 hour.
2. Stir in the crushed oreos, and spread on top of first cake layer.

Additional Supplies
fun size Kit Kats (I'm not sure how many, so just grab a Halloween sized bag of them)
M&Ms
sprinkles
Assembly
1. Place a dollop of frosting on the center of your cake plate, followed by one cake layer - this keeps the cake from sliding around.
2. Spread the bottom cake layer with the oreo cream filling, leaving about a 1 inch border.
3. Place the second cake layer on top of the oreo filling, and use chocolate frosting to frost top and sides of cake. Don't worry if it doesn't look pretty, it'll be covered with candy!
4. Place Kit Kats vertically around the entire cake and press slightly to stick them to the frosting.
5. Grab some M&Ms and place them in the space between the top of the Kit Kats and the top of the cake.
6. Cover the top with sprinkles and keep in the refrigerator until you're ready to eat!

This cake screams party! And, it's so fun for kids to eat because it's covered in colorful and chocolate-y candy goodness . . . You probably won't get many complaints from the adults either. :)


Waiting patiently while we sing . . . 

Working hard to blow out those candles!


Hugs and cookies,

Amanda

Wednesday, February 22, 2012

A Tale of Two Cakes - Part 2

Have you seen these things called "cupcake cakes"? They're so fun for birthday parties - especially for kids! If you haven't heard of or seen them, basically you take unfrosted cupcakes and form them into some sort of shape (e.g. I used a number 1 for Aiden's bday) and then frost all of them together so the top looks like one big decorated cake. So cool. And, as I said, it's perfect for a party because everyone can just grab a cupcake and you don't have to worry about slicing a cake. I'm in love with the idea.

Mine didn't turn out as smoothly as the video showed, but I already know what I did wrong so I can fix it next time and you won't make the same mistake! Usually when I bake cupcakes, I like a little dome over the liner after they're baked. Apparently (as I discovered), that's not ideal for a cupcake cake. You want the cupcakes as close together as possible so there are few to no gaps between them; otherwise what happens is you need a lot of frosting to put in those gaps. (As I'm writing this, a light went off in my head telling me I could have just trimmed the edges off the cupcakes . . . sigh). Anyway, underfill your cupcake liners a little bit so they don't spread too far over the edges as they bake. Lesson learned.

The cupcake and frosting recipes I used came from "Cupcakes From The Cake Mix Doctor" and were titled "The Best Birthday Cupcakes (with two frostings)" - how perfect is that?!

The Best Birthday Cupcakes
1 pkg. butter golden cake mix
8 oz. softened cream cheese
1/2 c. sugar
1/2 c. water
1/2 c. vegetable oil
4 large eggs
1 Tbls. vanilla
1. Preheat oven to 350 degrees and line cupcake pan with paper liners (mine made exactly 24, but if you fill them less you'll get more . . . obviously).
2. Place all ingredients in mixer and mix on low speed about 30 seconds. Scrape down bowl, and mix on medium speed for 2 more minutes.
3. Fill cupcake liners 2/3 full (or a little less if you're doing a cupcake cake) and bake for 24-27 minutes. Allow to cool completely before frosting

Chocolate Syrup Frosting
1/2 c. softened butter
1/2 c. unsweetened cocoa powder
1/2 c. chocolate syrup
3 c. powdered sugar
1 T. milk
1 tsp. vanilla
1. Place butter, cocoa powder, and syrup in mixer and mix 1-2 minutes on medium.
2. Add sugar, milk, and vanilla, and mix on low until combined. Turn mixer to med-high and beat an additional 3-4 minutes.


On a Side Note: This is the first winter since I was little that I remember wishing there was snow on the ground. "Why?" you may ask. Asher got all this winter gear (snowpants, boots, mittens, shovel) and has only been able to use them twice! He had so much fun playing in the snow and being pulled on the sled, and I wish we could do it again! Especially since we also got some snowpants for Aiden on clearance that he hasn't been able to use at all yet. I was hoping to get some pictures of them being pulled together on the sled, but somehow doing that through the mud doesn't sound as appealing . . .

Tuesday, September 06, 2011

A Mickey Cake for Asher's Birthday

Our little Asher is already 2! I can't believe how much he's changed in the two short years since he was born. His personality amazes me - we can already see so much of his dad and me in his sense of humor, his stubbornness, and his inquisitive little mind . . . some of which he may not thank us for as he gets older. ;)

Right now, he loves Mickey Mouse, so I thought for his birthday I would try to bake a cake with Mickey on it. I didn't want to do a full-size Mickey cake because the majority of the frosting would have to be black and red - both difficult to achieve if you make the frosting yourself, and then your tongue/mouth ends up turning bright red or black. One of my mom's co-workers bakes a lot of cakes and goodies and she told my mom about this method she uses: you put a picture of the character you want under wax paper, create the character in frosting using the visible template, and then freeze it. After it freezes you're supposed to be able to place it frosting-side down on the frosted cake and peel away the wax paper and be left with your character . . . Well, I must have done something wrong because there were very few parts of the frosting that peeled off the paper. Luckily, it made enough of an imprint on the frosting that I was able to free-hand. I was happy with how it turned out, and more importantly Asher was able to recognize Mickey - success in my book! I still want to figure out how it's actually supposed to work, though. If I do, I'll let you know.
I also discovered these things called cake tattoos at our local Walmart in the cake decorating aisle. They're from Duff Goldman, the Ace of Cakes - and they were so easy! You peel off the design and stick it onto your recently frosted cake, cupcake, or cookie; I used them to decorate the sides of the cake. They are edible, but I wasn't a fan of the chewy texture (kind of like fondant for those of you who have had that). It does peel off easily, though. There were only a couple options in the store, but you can also order them here where there are many more designs to choose from.

I guess Asher couldn't wait to eat it because he stuck his
hand in the frosting while my back was turned :) 

I made a three-layer cake and used an 8-inch square cake pan. The layers were as follows: white cake/raspberry buttercream/chocolate cake/raspberry buttercream/white cake. The top and sides were frosted with regular buttercream. For the chocolate cake, I only used half the batter in the pan and made cupcakes out of the rest. I didn't use all of the raspberry buttercream between the layers because I didn't want frosting overkill, but next time I would because it was hard to taste it otherwise.
The recipes for the white cake and buttercream frosting can be found here.
The recipe for the chocolate cake can be found here.

Raspberry Buttercream
1/2 softened butter
3/4 c. seedless raspberry jam
3 c. powdered sugar
Beat butter and jam until creamy. Gradually beat in powdered sugar, then beat until fluffy, approximately 3 minutes.

Tuesday, August 16, 2011

Annual Ice Cream Cake!

It was my hubby's birthday on July 29th - his golden birthday, actually. I am so lucky to be with him. Intelligent, funny, kind-hearted, wonderful father, and let's not forget good-lookin'! I'm blessed, and so are our boys.
I forgot to mention he's also the boys' jungle gym!
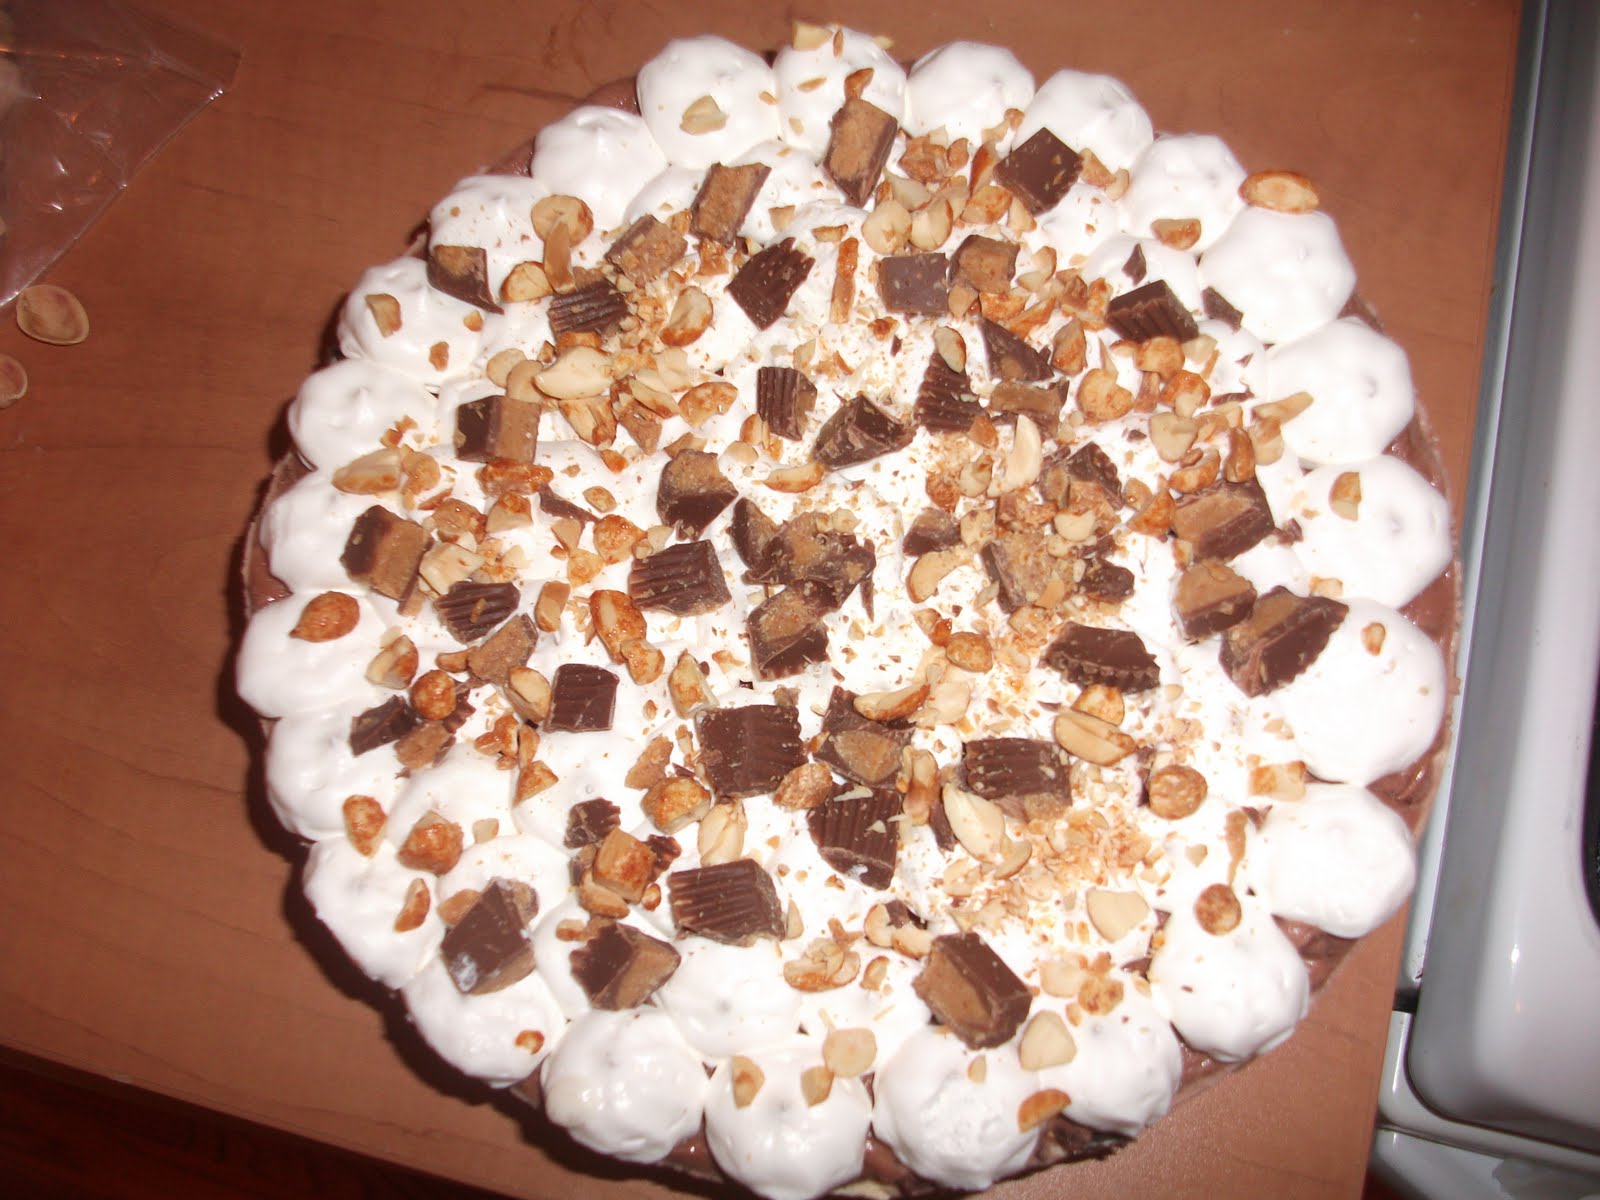
Anyway, back when Dusty and I first started dating (almost 8 years ago!), we were both in college, and surprise, surprise I didn't have much money. But, Dusty loves ice cream cakes, so for his birthdays I decided to try to make my own instead of buying them. I think this was the 6th birthday I've made an ice cream cake, and I think Dusty's been happy with all of them. The great thing about them is that they're so versatile! I've done them with oreo crusts, actual cake layers with ice cream between, and a variety different flavors . . . although most combinations revolve around chocolate and peanut butter because those are Dusty's favorites. The combinations are endless. This year was a cookie crust, hot fudge Reese's PB cups, ice cream, peanuts, ice cream, and whipped cream on the top. It went over really well, although Dusty and I each probably gained a few pounds since we were the only ones who ate it! (So far, Asher hates ice cream - too cold for the little guy!)

Ice Cream Cake

1st layer
1 pkg. Betty Crocker chocolate with peanut butter chips cookie mix
1/3 c. oil
2 T. water
1 egg
Hot fudge topping
Reese's PB cups

Preheat oven to 350 degrees. Mix all ingredients and press 2/3 into a greased 9-inch springform pan. Spread remaining dough on greased cookie sheet and bake both for 12 minutes. Allow to cool. Spread crust with hot fudge and chopped PB cups (the amount you use is up to you - I think I used 5 fun size candy bars)

2nd layer
2 1/2 c. vanilla ice cream, softened
1/2 c. caramel ice cream topping
1/3 c. peanut butter
1/3 c. dry roasted peanuts, chopped
Mix caramel and peanut butter, and fold into ice cream. Spread over cooled crust and sprinkle with peanuts. Freeze until solid - at least 2 hours.


3rd layer
2 1/2 c. chocolate ice cream, softened
Crumbled cookie from earlier
Mix ice cream with the chocolate peanut butter cookie baked during the first layer. Spread the chocolate ice cream over the vanilla and freeze again.


Top layer
8 oz. container Cool Whip
3/4 c. powdered sugar
Peanuts
Peanut butter cups
Mix Cool Whip with powdered sugar to stiffen, then spread or pipe on top of ice cream. Sprinkle with peanuts and chopped peanut butter cups. Freeze overnight if possible, or at least 2 hours, and eat up!