Showing posts with label Baking. Show all posts

Tuesday, December 17, 2013

Meyer Lemon Meltaways

When I'm thinking of what to include on my cookie tray, I always remember a piece of advice my mom gave me. When putting together a variety of sweets, it's always nice to include something citrus-y to provide a contrast to the richer, more decadent treats. These Meyer Lemon Meltaways are absolutely perfect. Even if I wasn't looking specifically for a citrus cookie, I would use these again. They are so buttery, tender, and scrumptious, with the perfect amount of tartness from the lemons, and sweetness from the powdered sugar. Cookie perfection.

I ate three of them in a matter of minutes before I stopped myself and dutifully put the rest away. If you don't have Meyer lemons, just use regular lemons. Or, you can use limes, which would be delicious, too. I happened to have some Meyer lemons on hand, courtesy of my parents, so of course I put them to the best use possible - dessert! Just writing this post makes me want to pull them out of the freezer and devour some more. But, I won't . . . Or will I? If my family doesn't see these on their cookie trays, I guess they'll know why. :)


Meyer Lemon Meltaways (original recipe found here)
3/4 c. softened butter
1 c. powdered sugar, divided
zest of 2 Meyer lemons
2 T. fresh Meyer lemon juice
1 T. vanilla
1 3/4 c. + 2 T. flour
2 T. cornstarch
1/4 t. salt
1. Cream together butter, and 1/3 c. powdered sugar until light and fluffy - 2-3 minutes.
2. Beat in lemon zest, lemon juice, vanilla, cornstarch, and salt.
3. Stir in flour until a stiff dough forms.
4. Place dough on a piece of plastic wrap, and form it into a 1 1/4 inch diameter log. Wrap in plastic wrap and refrigerate at least 1 hour.
5. Preheat oven to 350 degrees, and line 2 pans with parchment paper.
6. Slice the dough into 1/4 inch thick slices (I got 36 cookies out of mine) and place on the cookie sheets.
7. Bake 10-12 minutes, or until the bottoms are just slightly browned. Remove from the oven, allow to cool 5-10 minutes, then gently toss with the remaining 2/3 c. powdered sugar. Allow to cool completely before storing in an airtight container.
**Before serving, you can dust them with powdered sugar again if you want.


Hugs and cookies,
Amanda

Sunday, December 15, 2013

Salted Nut Roll Bars

Decorating's done. Shopping's almost done. Baking . . . not quite there yet. :) There are still a few things left on my list to make, but I'm steadily chipping away. And, at least it's fun! The recipe I'm sharing today is a family favorite, both in my family and Dusty's. Actually, it seems to be a favorite everywhere!

If you make these, you'll be a rock star. Seriously. Every time I've made these, people have fallen in love with them. They're crunchy, chewy, salty and sweet. I love everything about them - especially the fact that they're super easy! I can't believe I haven't shared this recipe with you yet - it's a staple around here, especially at Christmas. It's one of those out-of-the-ordinary additions to your cookie tray that people will love.

I found the recipe in my home church's cookbook years ago. I know there are others floating around on the internet that have slight differences, but I've never bothered trying them because this one turns out perfectly every time! Hope you and yours enjoy them as much as we do!

Salted Nut Roll Bars
1 pkg. yellow cake mix
1/2 c. softened butter or margarine
1 egg, lightly beaten
3 c. mini marshmallows
12 oz pkg (2 c.) peanut butter chips
1/4 c. butter or margarine
2/3 c. light corn syrup
2 t. vanilla
2 c. rice krispies
2 c. peanuts (I prefer dry roasted)

1. Preheat oven to 350 degrees, and grease a 9x13 pan.
2. Stir together dry cake mix and egg. With a pastry cutter, or two knives, cut in 1/2 c. softened butter until a crumbly, sand-like mixture forms. Press firmly into prepared pan and bake about 12 minutes.
3. Sprinkle crust with marshmallows, and bake 3-5 more minutes, or until marshmallows are puffed. (They should still be white, not browned.) Allow to cool while you make the topping.
4. In a medium-large saucepan, melt the peanut butter chips, 1/4 c. butter, and corn syrup until smooth. Stir in vanilla, rice krispies, and peanuts.
5. Carefully spread over marshmallow layer, and allow to cool completely before slicing.


Hugs and cookies,
Amanda


Wednesday, December 04, 2013

Holiday Baking How-To

The holiday season is upon us. There are a million things to do: shopping for gifts for family, friends, teachers; decorating the house and the tree; menu planning; travel planning; packing, unpacking, repacking; Christmas programs; wrapping presents; stuffing stockings . . . And there are probably many more things I didn't list! How on earth can you find time to bake goodies - it's just one extra thing that it's hard to find time to do in the hustle and bustle. I'm here to tell you it's doable!

I love holiday baking. I love putting together cookie trays and filling them with a variety of cookies and candies - trying out new recipes while including old favorites. It gives me a lot of joy - especially when I come across a recipe that I know a family member will love. All that said, I've come up with a list of 5 things that make my holiday baking smoother, less stressful, and enjoyable.

Tip #1: Use parchment paper
Maybe you've never used it before, or maybe you just don't use it in your everyday baking (I often don't). Use it now! Line your cookie sheets with it and you won't have to be worried or concerned that your cookies will stick to the pan and you'll have wasted time/effort/money making them. And it makes clean-up a cinch!

Tip #2: Bake ahead and freeze
When it comes down to the last few days before a get-together or family gathering, you usually don't have extra time to bake 6 dozen cookies or bars to make your cookie tray fabulous. Most cookies and bars hold up great when frozen, with little to no difference in taste or texture. With cookies, bake them and allow them to cool completely. Put them in ziplock bags, or plastic storage containers with waxed paper between layers. If they're decorated cookies, it's a bit trickier, but you can always freeze the cookies and pull them out to decorate the day before or the day you need them
.
For bars, line your pan with parchment paper so there's a bit of overhang. When they've baked and cooled, use the parchment paper to lift them out of the pan. Wrap the entire thing (carefully) in plastic wrap, then tinfoil. Then, you can place them in a larger container, or back in the pan you used and into the freezer. By freezing it as a whole instead of individual bars, you help maintain freshness. Pull them out when you need them, and allow them to defrost until you are able to cut them. (When cutting bars for my tray, I cut off the edges for a nicer-looking edge. You can also cut them diagonally to make diamonds instead of squares for a little variety.)

Tip #3: Include non-traditional favorites
I'm all for using peppermint, ginger, eggnog, and any other seasonal flavors in my Christmas baking. But, I often find that people enjoy things that are outside the box, too. If you have a recipe that's always a hit, don't be afraid to put in on your cookie tray! They don't have to be fancy. Do you love peanut butter cookies? Or maybe you have a killer chocolate chip cookie recipe? Use it! People love when there are options they weren't expecting. And often those are the ones that go first and fastest.

Tip #4: Invest in a small cookie scoop
Cookie scoops in general are a huge time-saver. I have a larger one, and a smaller one that's about 1 Tbls. I always use the smaller one for Christmas baking. If you have 5-10 different cookies on your tray, you don't want people to get full after only tasting one! Make them smaller so your family and friends can enjoy a few without feeling guilty or overly-stuffed. (I usually say "who cares" and sample them all . . . How else will I know which is my favorite?) This cookie scoop is similar to the one I have (although the spring in mine broke after last Christmas - bummer), and I think it's the perfect size. You can also find something similar in most stores (i.e. Target, Walmart, etc.).

Tip #5: Looks aren't everything
Your cookies aren't all perfectly round? Your chocolate drizzles looks like chocolate blobs? The edges got a teensy bit too brown? Doesn't matter. People will eat them. People will love them. Unless you're selling them and people are basing their purchase on their looks, I think the "You eat with your eyes first" phrase is overrated. Don't get me wrong - pretty food is initially more appetizing; but, keep in mind you're bringing these as a treat. People are eating them for free - they won't mind if they don't look quite as fancy as the bakeries' treats. Don't be afraid to try new decorating techniques, but don't get bummed out if they don't look picture perfect. Just enjoy the process, and take pride in your accomplishment! (And hey, if people don't eat them, you get to eat the leftovers . . . Ain't nothin' wrong with that!)

So, there you go. Hopefully you found something helpful in there. I'll be posting some new recipes later, but for now, here's a list of some past goody favorites that will be making their appearance on my cookie tray again this year:

Cranberry Bliss Bars - Seriously, I think these should be on everyone's baking list. Even if you think you don't like cranberries, I think you'll love these. White chocolate and cream cheese? Heck yeah!

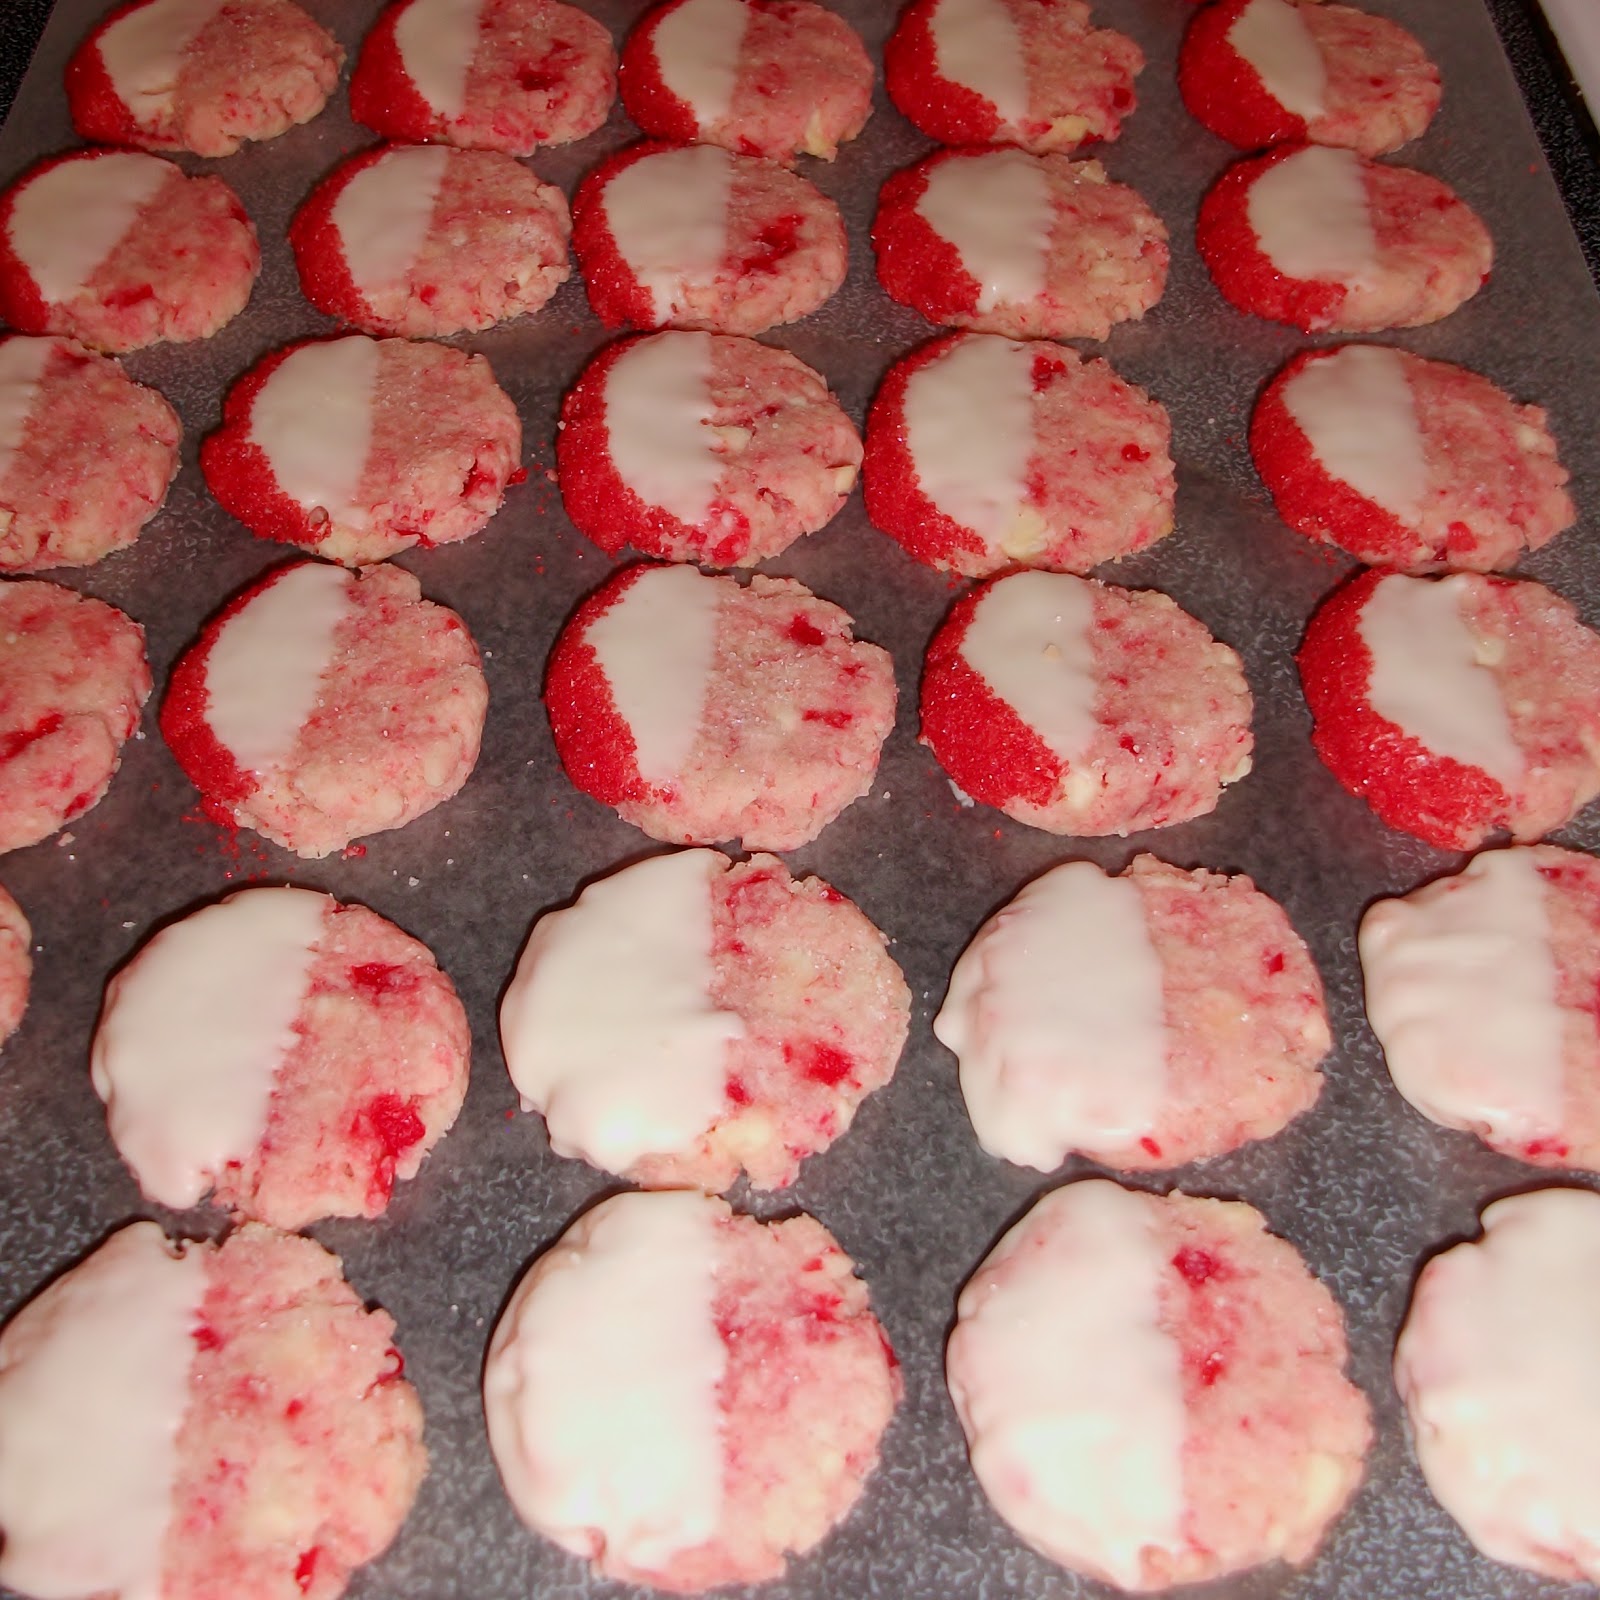
White Chocolate Cherry Shortbread Cookies - Delicious combo, and so pretty.

Better-Than-Mounds Bars - I always have to include something coconutty for the coconut lovers on both sides of my family and these never disappoint!

Stay tuned for recipes to come!

Hugs and cookies,

Amanda

Thursday, January 10, 2013

Hot Cocoa Cookies

I love hot chocolate. It's my winter indulgence. Of course I love fancy, flavored types, but I definitely don't turn my nose up at a Swiss Miss packet! Often, I have more cocoa on my hands than I know what to do with since I'm the only one in the house who drinks it, so I was excited to find a way to use a couple packets for something other than drinking.

For this recipe, I used a combination of these cookies and these cookies, and added a little spin of my own by rolling the cookies in hot cocoa/powdered sugar before baking. They were a hit in our household - Dusty loved them, and the boys kept asking for them . . . It probably doesn't hurt that there's half a marshmallow right on top! The cookies are soft, chewy, and fudgy and sure to please a chocolate-lover. I hope you like them as much as we do!

Hot Cocoa Cookies
1 pkg. brownie mix (dry)
1 1/4 c. flour
1/4 c. brown sugar
1/2 c. butter, melted
2 eggs
2 Tbls water
2 packets hot cocoa mix
1/4 c. powdered sugar
large marshmallows (about 10)
chocolate bars (probably 2 or 3; cut into about 1 inch pieces)
1. Mix together brownie mix, flour, sugar, butter, eggs, and water until a stiff dough forms. Refrigerate 2 hours.
2. Preheat oven to 350, and line a baking sheet with parchment paper.
3. Mix together hot cocoa mix and powdered sugar. Drop dough by heaping Tbls. into mixture and roll until covered. Place on prepared baking sheet. Bake 10 minutes.
4. Meanwhile, cut each marshmallow in half, and stick a piece of chocolate on the bottoms. When cookies come out of the oven, gently press marshmallow/chocolate into the center and continue baking 4-5 minutes.
5. Eat warm for an ooey-gooey treat, or allow to cool.


Hugs and cookies,

Amanda

Saturday, December 22, 2012

12 Days of Goodies: Day 12 - Eggnog Quick Bread

Well, I made it! Twelve goodies before Christmas - I started to think it wouldn't be possible because with the snow storm on Thursday, we lost our power allllll day long. But, I kicked it into high gear on Friday to make sure I completed it. Thank goodness! :)

Since we're heading out of town my husband and I celebrated Christmas with our boys yesterday and today. They loved all their gifts and all of the special things that go along with Christmas. One of my favorite traditions is to make a birthday cake for Jesus (which the boys helped with this year!) just to keep the focus on what's really important this time of year . . . The birth of our Savior. The birthday cake tradition is one I grew up with, and I love sharing that with the boys. It's a wonderful feeling to keep a tradition like that going, and thinking that maybe someday the boys will be doing the same with their families, too!

This last goody is a quick bread, and it's perfect if you have leftover eggnog from a party or family gathering . . . Or if you're the only one who likes eggnog but can't drink the entire thing yourself. Even if you don't like eggnog, I think you'll enjoy this bread - the eggnog doesn't stand out as a flavor (although you could certainly use it to make a glaze with some powdered sugar), but just adds a delicious, rich, background flavor. It's perfect for breakfast or to have on your cookie tray.

Eggnog Quick Bread (original recipe found here)
1/2 c. butter, melted
1/2 c. vegetable oil
2 eggs
2 c. sugar
2 c. eggnog
2 tsp. vanilla
2 Tbls. Southern Comfort (optional)
1/2 tsp. nutmeg
2 tsp. baking powder
2 tsp. baking soda
4 c. flour
1. Preheat oven to 350 degrees and grease 2 9x5 pans, or 1 9x5 pan and 4 mini pans.
2. Whisk together all ingredients but the flour until thoroughly combined.
3. Stir in flour until just combined.
4. Evenly distribute batter among the pans and bake larger loaves 45-50 minutes, and smaller loaves 25-30 minutes, or until golden brown and a toothpick comes out clean. Allow to cool 10 minutes in pan before turning out onto a cooling rack.


Hugs and cookies and merry Christmas!

Amanda

12 Days of Goodies: Day 11 - Better-Than-Mounds Bars

Usually during my Christmas baking I make chocolate dipped coconut macaroons, but this year I didn't feel like scooping out the individual cookies, baking them, then dipping them. However, my youngest brother loves those cookies, so I knew I still wanted to make something with chocolate and coconut.

These bars are easy. They are chewy. They have chocolate and coconut. They. Are. Amazingly delicious. They're one of those bars that I could keep eating and eating despite how full I feel. Dangerous, I know. But seriously, they come together so quickly and are so yummy - you won't be disappointed.

Better-Than-Mounds Bars (original recipe can be found here)
1 3/4 c. graham cracker crumbs
1/2 c. butter, melted
1/3 c. sugar
7 oz. sweetened flaked coconut
14 oz. can sweetened condensed milk
1 1/2-2 c. semi-sweet chocolate chips (depending on how chocolate-y you want them)
1 Tbls. peanut butter
1. Preheat oven to 350 degrees, line a 9x13 pan with foil, and grease it.
2. With a fork, mix together graham cracker crumbs, butter, and sugar. Evenly and firmly press into pan. Bake 10 minutes.
3. Meanwhile, stir together coconut and condensed milk. Carefully spread over baked crust, and place back in the oven to bake 15 minutes. Allow to cool.
4. Melt chocolate chips and peanut butter together, and spread over cooled bars. Place in the fridge for 1/2 an hour to set up.


Hugs and cookies,

Amanda

Friday, December 21, 2012

12 Days of Goodies: Day 10 - Cranberry Bliss Bars

Apparently these bars are a knock-off of what they serve at Starbucks. I've never tried them there, but I can say that these might be my favorite goody so far. They are so delicious and decadent and easy to put together that I know I'll definitely be making them even when the Christmas season is over.

Cranberries aren't used very often (at least in my baking), but you'd definitely miss them if you left them out of this recipe. They pair so perfectly with the white chocolate that it's become a new favorite flavor combination of mine. What? Me? Venturing away from chocolate/peanut butter? I know, I know . . . But these are totally worth it. And the white chocolate cream cheese frosting puts them over the top!

Cranberry Bliss Bars (original recipe can be found here)
1 c. butter, melted
2 c. brown sugar
2 eggs
3 tsp. vanilla
1/2 tsp. salt
2 c. flour
1 1/2 c. white chocolate chips
1 c. dried cranberries
1/2 tsp. orange zest
Frosting
4 oz. cream cheese, softened
1 c. white chocolate chips, melted
2 c. powdered sugar
1/3 c. dried cranberries, chopped into smaller pieces
1. Preheat oven to 350 and line a 9x13 pan with foil and grease it.
2. Mix together butter, brown sugar, eggs, vanilla, and salt until thoroughly combined.
3. Stir in flour, white chocolate chips, cranberries, and orange zest.
4. Spread evenly in prepared pan, and bake 25-30 minutes, or until the top is light golden brown. Allow to cool.
5. For frosting, beat cream cheese with about 3/4 of the melted white chocolate (just eyeball it).
6. Add the powdered sugar, and beat for 3-4 minutes until light and fluffy. Spread over cooled bars, and sprinkle chopped cranberries over the top. Use a fork to drizzle the remaining white chocolate over the top of the cranberries. (Re-warm it in the microwave for 10-20 seconds if it's set up.)


Hugs and cookies,

Amanda

12 Days of Goodies: Day 9 - Toffee Apple Pie Cookies

These cookies use the warm spices of the season (like cinnamon and nutmeg), but kick it up by adding in graham cracker crumbs, chopped apples, and toffee. They're soft and just sweet enough with the white chocolate drizzle on top (you can certainly leave that off). They're traditional enough with the flavors, but those extra ones make them special for the season. Hope you like them!

Toffee Apple Pie Cookies (original recipe can be found here)
1/2 c. softened butter
1/2 c. shortening
1 c. brown sugar
1/2 c. sugar
2 eggs
2 tsp. vanilla
2 tsp. baking powder
1 tsp. salt
2 2/3 c. flour
1 c. graham cracker crumbs
1 tsp. cinnamon
1/2 tsp. nutmeg
1 c. finely chopped apple (I used Granny Smith)
1 c. toffee pieces (not chocolate covered)
1/2 c. white chocolate chips
1 tsp. vegetable oil
1. Preheat oven to 350 degrees, and line baking sheets with parchment paper.
2. Cream together butter, shortening, and sugars.
3. Add in eggs, vanilla, baking powder, salt, cinnamon, and nutmeg, and beat again.
4. Stir in flour and graham cracker crumbs until just combined, then stir in the apple and toffee pieces.
5. Drop dough by Tbls. onto prepared sheets and bake 10-12 minutes. Allow to cool.
6. Melt white chocolate with vegetable oil, and use a fork to drizzle over the cookies. Allow the chocolate to harden before storing.


Hugs and cookies,

Amanda

Wednesday, December 19, 2012

12 Days of Goodies: Day 8 - Salted Caramel Chocolate Chip Cookie Bars

The name is a mouthful, but it's totally worth it for these cookie bars. They're so gooey and delicious it's almost impossible to stop eating them. Thanks to Brown Eyed Baker for the recipe idea!

I used my own chocolate chip cookie dough recipe, and since I was using a 9x13 pan I used an entire 14 oz. bag of caramels instead of 11 oz. as the original recipe calls for in an 8x8 pan. I thought there was still plenty of caramel flavor and texture without fully doubling the caramel called for, but feel free to use 22 oz. instead of 14, if you want. Also, to make this recipe even easier, you can use store-bought cookie dough. I'd use two packages, one for the bottom crust, one for the top, if you're using a 9x13 pan.

I think this recipe would be really versatile, too - it would be excellent with peanut butter cookie dough, or oatmeal chocolate chip, or even sugar cookie dough. I love recipes that I can easily change up for a delicious treat!

Salted Caramel Chocolate Chip Cookie Bars
1 c. melted butter
1 c. brown sugar
1 c. sugar
2 eggs
2 tsp. vanilla
1 tsp. salt
1 tsp. baking soda
3 1/2 c. flour
1 1/2-2 c. chocolate chips
14 oz. bag of caramels, unwrapped
2 Tbls. milk or cream
1. Preheat oven to 325 degrees, and grease a 9x13 pan.
2. Stir together melted butter, and both sugars until smooth.
3. Stir in eggs, vanilla, salt, and soda.
4. Stir in flour until just combined, and then stir in the chocolate chips.
5. Spread half the dough in the prepared pan.
6. Melt together caramels and milk until smooth. Pour over dough in the pan.
7. Use the rest of the cookie dough to spread over the top of the caramel, doing your best to make sure all the caramel is covered.
8. Bake about 45 minutes, until the edges are golden brown, and the top is lightly browned. Allow to come to room temperature, then refrigerate for about half an hour before cutting.


Hugs and cookies,

Amanda

Tuesday, December 18, 2012

12 Days of Goodies Day 7: Peanut Butter Kiss Cookies in Reverse

One of my favorite cookies is the peanut butter cookies that are rolled in sugar and have a Hershey's kiss pressed into the center or a chocolate star. For probably the gazillionth time, I love the peanut butter and chocolate combination. These cookies were a fun twist on that traditional cookie.

The dough is chocolate with a hint of peanut butter, and originally you were supposed to form the dough around a small ball of peanut butter/powdered sugar. Well, I didn't feel like being quite that putzy with it, so I rolled the chocolate dough in sugar, baked the cookies, and when they came out of the oven I pressed my thumb into the center and filled it with the peanut butter filling. The result was delicious, and I have a feeling this will be a popular cookie with my hubby and sibs, who all seem to love chocolate/peanut butter, too!

You can always use a peanut butter kiss to press into the center, too, or any other small piece of chocolate you think would be yummy.

Chocolate Peanut Butter Surprise Cookies (original recipe can be found here)
1/2 c. butter, softened
1/2 c. sugar, plus extra for rolling
1/2 c. brown sugar
1 c. peanut butter, divided
1 tsp. vanilla
1 egg
1/2 tsp. baking soda
1/4 tsp. salt
1/2 c. unsweetened cocoa powder
1 1/2 c. flour
1/2 c. powdered sugar
2-3 Tbls. milk
1. Preheat oven to 350 degrees and line a baking sheet with parchment paper.
2. Cream together butter, both sugars, and 1/2 c. peanut butter.
3. Add vanilla, egg, baking soda, and salt, and beat again.
4. Slowly stir in cocoa powder and flour.
5. Form dough into 1 inch balls and roll in regular sugar. Flatten slightly with the bottom of a glass and bake 7-9 minutes.
6. Immediately after removing them from the oven, make an indentation in the center of the cookie with your thumb (careful, they're hot!) or the handle of a wooden spoon. Allow to cool.
7. Beat together powdered sugar, remaining 1/2 c. peanut butter, and milk until smooth. This will be thick. Pipe or spoon a blob into the center of each cookie and press slightly with your finger to make it smooth.

Hugs and cookies,

Amanda


Monday, December 17, 2012

12 Days of Goodies: Day 6 - White Chocolate Cherry Shortbread

This recipe was "pinned" as one of the best Christmas cookie exchange recipes on Pinterest, so I figured I better give it a whirl. It didn't hurt that the name made them sound delicious, and they're such a pretty color!

When I made the dough, it was really crumbly at first but came together a little better after some kneading. I was worried that the cookies would just be too crumbly and fall apart, but that wasn't the case at all. They stayed nicely formed while they baked, and were actually quite sturdy! They'd make a great traveling cookie, and they taste amazing; it's nice to have a cookie that's a little out of the ordinary and this one is exactly that.

White Chocolate Cherry Shortbread (original recipe can be found here)
1/2 c. maraschino cherries, drained and finely chopped
2 1/2 c. flour
1/2 c. sugar
1 c. cold butter
1/2 tsp. almond extract
12 ounces white chocolate chips (chop up 2/3 c. to use in the dough)
1-2 tsp. vegetable oil
sprinkles or edible glitter, optional
1. Preheat oven to 325 and line a cookie sheet with parchment paper.
2. Mix together flour and sugar, then cut in butter with a pastry blender until fine crumbs form.
3. Stir in almond extract, chopped cherries and chopped white chocolate chips. Knead dough until it comes together in a ball.
4. Drop dough by Tbls. onto prepared sheet, and flatten using the bottom of a glass dipped in sugar.
5. Bake for 10-12 minutes, until cookies are set in the center. Allow to cool.
6. Melt remaining chocolate chips and vegetable oil until smooth. Dip half the cookie in chocolate and the edge in sprinkles, if desired. Set on wax paper to cool and set.


Hugs and cookies,
Amanda

Saturday, December 15, 2012

12 Days of Goodies: Day 5 Super-Soft Ginger Cookies Done Two Ways

Ginger cookies tend to be a Christmas cookie staple, but many of them can leave you underwhelmed as far as flavor and texture go. Not so with these cookies - they are soooo soft, and the flavor is deep and rich from the combination of molasses, cinnamon, and ginger. If you think you don't like ginger cookies, I highly recommend giving these a try.

Half of the cookies I rolled in sugar before baking, and the other half I frosted with vanilla frosting after they had cooled. They're delicious both ways, and the recipe makes a lot (I got 80 cookies!) which is a plus if you want to hand them out to family and friends . . . or if you're doing 11 cookie trays, like I am. :)

Soft Ginger Cookies (recipe from Betty Crocker Cookbook)
1 c. sugar
3/4 c. sour cream
1 c. butter, softened
1/2 c. molasses
1 egg
1 1/2 tsp. baking soda
1 tsp. cinnamon
1 tsp. ginger
1/2 tsp. salt

3 c. flour

1. Preheat oven to 375 degrees and line a cookie sheet with parchment paper.
2. In a large bowl, beat sugar and butter until creamy, about 2 minutes. Scrape down bowl.
3. Add sour cream, molasses, egg, baking soda, cinnamon, ginger, and salt, and beat again, 3-4 minutes.
4. Stir in flour until just combined.
5. Drop dough by Tbls onto prepared cookie sheets. Roll in sugar if desired. Bake 9-11 minutes, or until cookies are set. Let cool on pan for a couple minutes, then move to cooling racks to cool completely.
*I used my basic buttercream recipe to frost my cookies, but use whatever you like best!

Vanilla Buttercream
1/2 c. butter
1/2 c. shortening
4 c. powdered sugar
1 Tbls. vanilla
2-3 Tbls. milk
1. Beat together butter and shortening until light and fluffy, 3 minutes.
2. Slowly add powdered sugar and beat on med.-high speed for 5 minutes.
3. Beat in vanilla and milk.


Hugs and cookies,

Amanda

Friday, December 14, 2012

12 Days of Goodies: Day 4 - Mint Meringue Kisses

You can't do holiday treats without including something with peppermint - it captures the season like few other flavors can. Peppermint isn't usually my favorite flavoring, but when it's mixed with chocolate it takes on a whole different flavor. 

The wonderful thing about these cookies is how absolutely light and airy they are. They're like crisp puffs of air with a light peppermint taste complemented by the light dip in chocolate. You can drizzle chocolate over the tops if you prefer, instead of dipping; and, if you don't want to pipe the meringues, you can certainly just drop them by Tbls. onto the baking sheet and they'll be just as lovely and delicious.

Mint Meringue Kisses (original recipe can be found here)
4 egg whites, at room temperature
1/2 tsp. cream of tartar
1/2 tsp. salt
1 1/3 c. sugar
1/4 tsp. peppermint extract
6-7 drops of green food coloring
1 c. semi-sweet chocolate chips
1 tsp. vegetable oil
1. Preheat oven to 225 degrees, and line 2 baking sheets with parchment paper - do not grease.
2. Combine egg whites, cream of tartar, and salt in a mixer and use the whisk attachment to whisk on high until soft peaks form, 2-3 minutes.
3. Add sugar 1 Tbls. at a time, and continue beating until stiff peaks form, another 2-3 minutes.
4. Beat in peppermint extract and food coloring.
5. Using a large star tip, pipe 1 inch stars on the parchment paper, leaving about 1 inch between each one.
6. Bake for 1 hour, turn the oven off, and leave the pans in the oven for another hour until they're cool and dry.
7. Melt together chocolate chips and vegetable oil, and drizzle over top of meringues, or dip tops in it. Allow chocolate to cool and set.


Hugs and cookies,
Amanda

Thursday, December 13, 2012

12 Days of Goodies: Day 3 - Raspberry Cheesecake Brownies

What's Christmas without a little decadence? These brownies are scrumptious, creamy, and fudgy. Yummmm. Everything's better when cream cheese is involved, and when it's mixed with chocolate and raspberry? Well, its perfect.

I made the recipe easier by using a boxed brownie mix, but feel free to use your favorite recipe! I found this recipe over at Bakers Royale.

Raspberry Cheesecake Brownies
1 box brownie mix, and ingredients called for on the box
Filling
1 8 oz. pkg cream cheese
1/3 c. sugar
1/4 c. raspberry puree or raspberry jam (I used jam)
1 egg
1/2 tsp. vanilla
1/4 tsp. salt
3 Tbls. flour
1 pt. fresh raspberries, optional
Glaze
1/4 c. raspberry jam
1/3 c. powdered sugar
1. Preheat oven to 350 degrees and line a 9x13 inch pan with parchment paper.
2. Prepare brownie batter according to package directions and pour 2/3 into prepared pan.
3. Beat all filling ingredients together (except fresh raspberries, if using) until light and fluffy, 3-4 minutes.
4. Carefully spread cream cheese filling over brownie batter, and dollop the rest of the brownie batter on top of it. Gently swirl using a knife to create a marbled effect. Press raspberries into the top, if using.
5. Bake 45 minutes, or until set. Allow to cool completely.
6. Warm raspberry jam in the microwave for 30 seconds, and whisk in powdered sugar. Drizzle over the top of the bars.

Hugs and cookies,

Amanda

Wednesday, December 12, 2012

12 Days of Goodies: Day 2 - Buttery Orange Cookies with a Chocolate Drizzle

These tender cookies are sure to be a hit on your holiday cookie tray. Unlike some cookies, these aren't overly sweet. They have a hint of orange, and the drizzle of chocolate on the top hits just the right note for sweetness and flavor combination. This was a new recipe for me this year, and it's one I'll be sure to return to and use again.

I love the combination of chocolate and orange (i.e. those chocolate oranges that you smash and then eat the segments), but if you're not a fan, feel free to leave out the orange zest and substitute almond or vanilla extract. Even peppermint extract might be a nice touch! I used milk chocolate for the drizzle, but if you like semi-sweet or bittersweet, or even white chocolate, go with it! You can adapt this cookie many different ways to suit your tastes.

Buttery Orange Cookies with a Chocolate Drizzle (recipe slightly adapted from Taste of Home Christmas Cookies 2012)
1 c. softened butter
1/2 c. powdered sugar
1 tsp. orange zest
1 tsp. orange extract
1/4 tsp. salt
2 c. flour
1/2 c. sugar
1/2-3/4 c. chocolate chips (I used milk chocolate, but you can use your favorite)
1. Preheat oven to 350 and line baking sheets with parchment paper.
2. Cream butter and powdered sugar until light and fluffy, 2-3 minutes.
3. Beat in zest, extract and salt.
4. Add flour and mix until combined - this is a stiff dough.
5. Drop dough by Tbls. onto prepared baking sheet. Dip tops of dough in sugar, and flatten slightly with the bottom of a glass.
6. Bake cookies 10-12 minutes, or just until set - they shouldn't be brown.
7. Once cookies have cooled, melt chocolate chips, and use a fork to drizzle the chocolate over the tops of the cookies. Alternately, you could dip half the cookie in chocolate, although you'll need more chocolate chips for this.
8. Place in the fridge or freezer until chocolate sets and hardens - 20-30 minutes.

Hugs and cookies,

Amanda

Tuesday, December 11, 2012

12 Days of Goodies: Day 1 - Monster Bars

It's that time of year again when I get a little more baking-crazy than usual (which is saying something) and I couldn't be more excited! I love Christmas-time and all that goes along with it - decorations, lights, Christmas church services, Christmas programs (Asher's in his first one this year!), and baking!

*I don't know if I'll get 12 days in a row, but I'll be sure to get ya 12 goodies before Christmas! Hmm . . . I guess I left it a little late this year . . . Surprise, surprise.

The first recipe is an old stand-by that's not just good for Christmas, but year-round. It's a crowd-pleaser every time, the bars are easy to throw together, and the recipe makes a lot! Can't go wrong!

Monster Bars (recipe from my mom)
1/2 c. butter, softened
1 c. brown sugar
1 c. sugar
3 eggs
1 tsp. vanilla
2 tsp. baking soda
1 1/2 c. peanut butter (you can use crunchy or smooth; I prefer smooth)
4 1/2 c. oatmeal
1 c. chocolate chips
1 c. M&Ms (feel free to use the Christmas ones to make them festive!)
1. Preheat oven to 350 degrees, and grease an 11x17 pan.
2. Cream together butter and sugars until fully combined and fluffy - 2-3 minutes. Scrape down bowl.
3. Add eggs, vanilla, baking soda, and peanut butter and beat again until everything's smooth.
4. Slowly stir in oatmeal, chocolate chips, and M&Ms - you might need to do some by hand at the end to make sure it's all fully incorporated.
5. Spread in prepared pan, and bake 17-20 minutes, or until edges are light golden brown. You don't want to over-bake these because you want them to stay nice and soft and chewy.


Hugs and cookies,

Amanda

Wednesday, November 14, 2012

You Can't Beat Betty!

Fall baking means cinnamon, nutmeg, pumpkin, and . . . apples! I love apple desserts. (Although I hate peeling and slicing them.) One of my all-time favorites is Apple Crisp. I could probably eat an entire pan by myself . . . Who am I kidding? I did eat an entire 8x8 pan by myself over the course of two days! I'd blame it on pregnancy, but if I'm being honest that had nothing to do with it.  I console myself in the fact that it's really just apples with a nice crunchy, almost granola-like, topping - totally healthy, right? Maybe not. I digress.

I love my mom's Apple Crisp. It's the perfect combination of tart apples and sweet crumble topping. When I asked for the recipe, she said she always uses the one straight out of her Betty Crocker Cookbook. Thankfully she gave me a copy as a wedding shower gift . . . Crisis averted! The recipe is so simple and delicious; you really can't go wrong. A dollop of whipped cream or ice cream wouldn't go amiss either. So, if you're in a fall-ish, apple-y, baking mood, give this recipe a whirl and I don't think you'll be disappointed. Just make sure someone else is around who's willing to eat it with you or you might find yourself staring at an empty pan wondering what the heck happened. :)

Apple Crisp (recipe from Betty Crocker)
4 c. (4 medium) Granny Smith apples, peeled and thinly sliced
3/4 c. brown sugar
1/2 c. flour
1/2 c. oatmeal
1/3 c. butter
3/4 tsp. nutmeg
3/4 tsp. cinnamon
1/4 tsp. salt
1. Preheat oven to 375 degrees, and grease an 8x8 inch pan
2. Combine sugar, flour, oatmeal, butter, nutmeg, cinnamon, and salt until well combined.
3. Spread apples in the bottom of the pan.
4. Sprinkle crumb topping evenly over apples.
5. Bake 30-45 minutes, depending on how firm you want your apples (I like mine soft, but not mushy, and 45 is just right for me). Eat warm with whipped cream or ice cream.


Hugs and cookies,

Amanda