Showing posts with label Cookies. Show all posts

Tuesday, December 17, 2013

Meyer Lemon Meltaways

When I'm thinking of what to include on my cookie tray, I always remember a piece of advice my mom gave me. When putting together a variety of sweets, it's always nice to include something citrus-y to provide a contrast to the richer, more decadent treats. These Meyer Lemon Meltaways are absolutely perfect. Even if I wasn't looking specifically for a citrus cookie, I would use these again. They are so buttery, tender, and scrumptious, with the perfect amount of tartness from the lemons, and sweetness from the powdered sugar. Cookie perfection.

I ate three of them in a matter of minutes before I stopped myself and dutifully put the rest away. If you don't have Meyer lemons, just use regular lemons. Or, you can use limes, which would be delicious, too. I happened to have some Meyer lemons on hand, courtesy of my parents, so of course I put them to the best use possible - dessert! Just writing this post makes me want to pull them out of the freezer and devour some more. But, I won't . . . Or will I? If my family doesn't see these on their cookie trays, I guess they'll know why. :)


Meyer Lemon Meltaways (original recipe found here)
3/4 c. softened butter
1 c. powdered sugar, divided
zest of 2 Meyer lemons
2 T. fresh Meyer lemon juice
1 T. vanilla
1 3/4 c. + 2 T. flour
2 T. cornstarch
1/4 t. salt
1. Cream together butter, and 1/3 c. powdered sugar until light and fluffy - 2-3 minutes.
2. Beat in lemon zest, lemon juice, vanilla, cornstarch, and salt.
3. Stir in flour until a stiff dough forms.
4. Place dough on a piece of plastic wrap, and form it into a 1 1/4 inch diameter log. Wrap in plastic wrap and refrigerate at least 1 hour.
5. Preheat oven to 350 degrees, and line 2 pans with parchment paper.
6. Slice the dough into 1/4 inch thick slices (I got 36 cookies out of mine) and place on the cookie sheets.
7. Bake 10-12 minutes, or until the bottoms are just slightly browned. Remove from the oven, allow to cool 5-10 minutes, then gently toss with the remaining 2/3 c. powdered sugar. Allow to cool completely before storing in an airtight container.
**Before serving, you can dust them with powdered sugar again if you want.


Hugs and cookies,
Amanda

Wednesday, December 04, 2013

Holiday Baking How-To

The holiday season is upon us. There are a million things to do: shopping for gifts for family, friends, teachers; decorating the house and the tree; menu planning; travel planning; packing, unpacking, repacking; Christmas programs; wrapping presents; stuffing stockings . . . And there are probably many more things I didn't list! How on earth can you find time to bake goodies - it's just one extra thing that it's hard to find time to do in the hustle and bustle. I'm here to tell you it's doable!

I love holiday baking. I love putting together cookie trays and filling them with a variety of cookies and candies - trying out new recipes while including old favorites. It gives me a lot of joy - especially when I come across a recipe that I know a family member will love. All that said, I've come up with a list of 5 things that make my holiday baking smoother, less stressful, and enjoyable.

Tip #1: Use parchment paper
Maybe you've never used it before, or maybe you just don't use it in your everyday baking (I often don't). Use it now! Line your cookie sheets with it and you won't have to be worried or concerned that your cookies will stick to the pan and you'll have wasted time/effort/money making them. And it makes clean-up a cinch!

Tip #2: Bake ahead and freeze
When it comes down to the last few days before a get-together or family gathering, you usually don't have extra time to bake 6 dozen cookies or bars to make your cookie tray fabulous. Most cookies and bars hold up great when frozen, with little to no difference in taste or texture. With cookies, bake them and allow them to cool completely. Put them in ziplock bags, or plastic storage containers with waxed paper between layers. If they're decorated cookies, it's a bit trickier, but you can always freeze the cookies and pull them out to decorate the day before or the day you need them
.
For bars, line your pan with parchment paper so there's a bit of overhang. When they've baked and cooled, use the parchment paper to lift them out of the pan. Wrap the entire thing (carefully) in plastic wrap, then tinfoil. Then, you can place them in a larger container, or back in the pan you used and into the freezer. By freezing it as a whole instead of individual bars, you help maintain freshness. Pull them out when you need them, and allow them to defrost until you are able to cut them. (When cutting bars for my tray, I cut off the edges for a nicer-looking edge. You can also cut them diagonally to make diamonds instead of squares for a little variety.)

Tip #3: Include non-traditional favorites
I'm all for using peppermint, ginger, eggnog, and any other seasonal flavors in my Christmas baking. But, I often find that people enjoy things that are outside the box, too. If you have a recipe that's always a hit, don't be afraid to put in on your cookie tray! They don't have to be fancy. Do you love peanut butter cookies? Or maybe you have a killer chocolate chip cookie recipe? Use it! People love when there are options they weren't expecting. And often those are the ones that go first and fastest.

Tip #4: Invest in a small cookie scoop
Cookie scoops in general are a huge time-saver. I have a larger one, and a smaller one that's about 1 Tbls. I always use the smaller one for Christmas baking. If you have 5-10 different cookies on your tray, you don't want people to get full after only tasting one! Make them smaller so your family and friends can enjoy a few without feeling guilty or overly-stuffed. (I usually say "who cares" and sample them all . . . How else will I know which is my favorite?) This cookie scoop is similar to the one I have (although the spring in mine broke after last Christmas - bummer), and I think it's the perfect size. You can also find something similar in most stores (i.e. Target, Walmart, etc.).

Tip #5: Looks aren't everything
Your cookies aren't all perfectly round? Your chocolate drizzles looks like chocolate blobs? The edges got a teensy bit too brown? Doesn't matter. People will eat them. People will love them. Unless you're selling them and people are basing their purchase on their looks, I think the "You eat with your eyes first" phrase is overrated. Don't get me wrong - pretty food is initially more appetizing; but, keep in mind you're bringing these as a treat. People are eating them for free - they won't mind if they don't look quite as fancy as the bakeries' treats. Don't be afraid to try new decorating techniques, but don't get bummed out if they don't look picture perfect. Just enjoy the process, and take pride in your accomplishment! (And hey, if people don't eat them, you get to eat the leftovers . . . Ain't nothin' wrong with that!)

So, there you go. Hopefully you found something helpful in there. I'll be posting some new recipes later, but for now, here's a list of some past goody favorites that will be making their appearance on my cookie tray again this year:

Cranberry Bliss Bars - Seriously, I think these should be on everyone's baking list. Even if you think you don't like cranberries, I think you'll love these. White chocolate and cream cheese? Heck yeah!

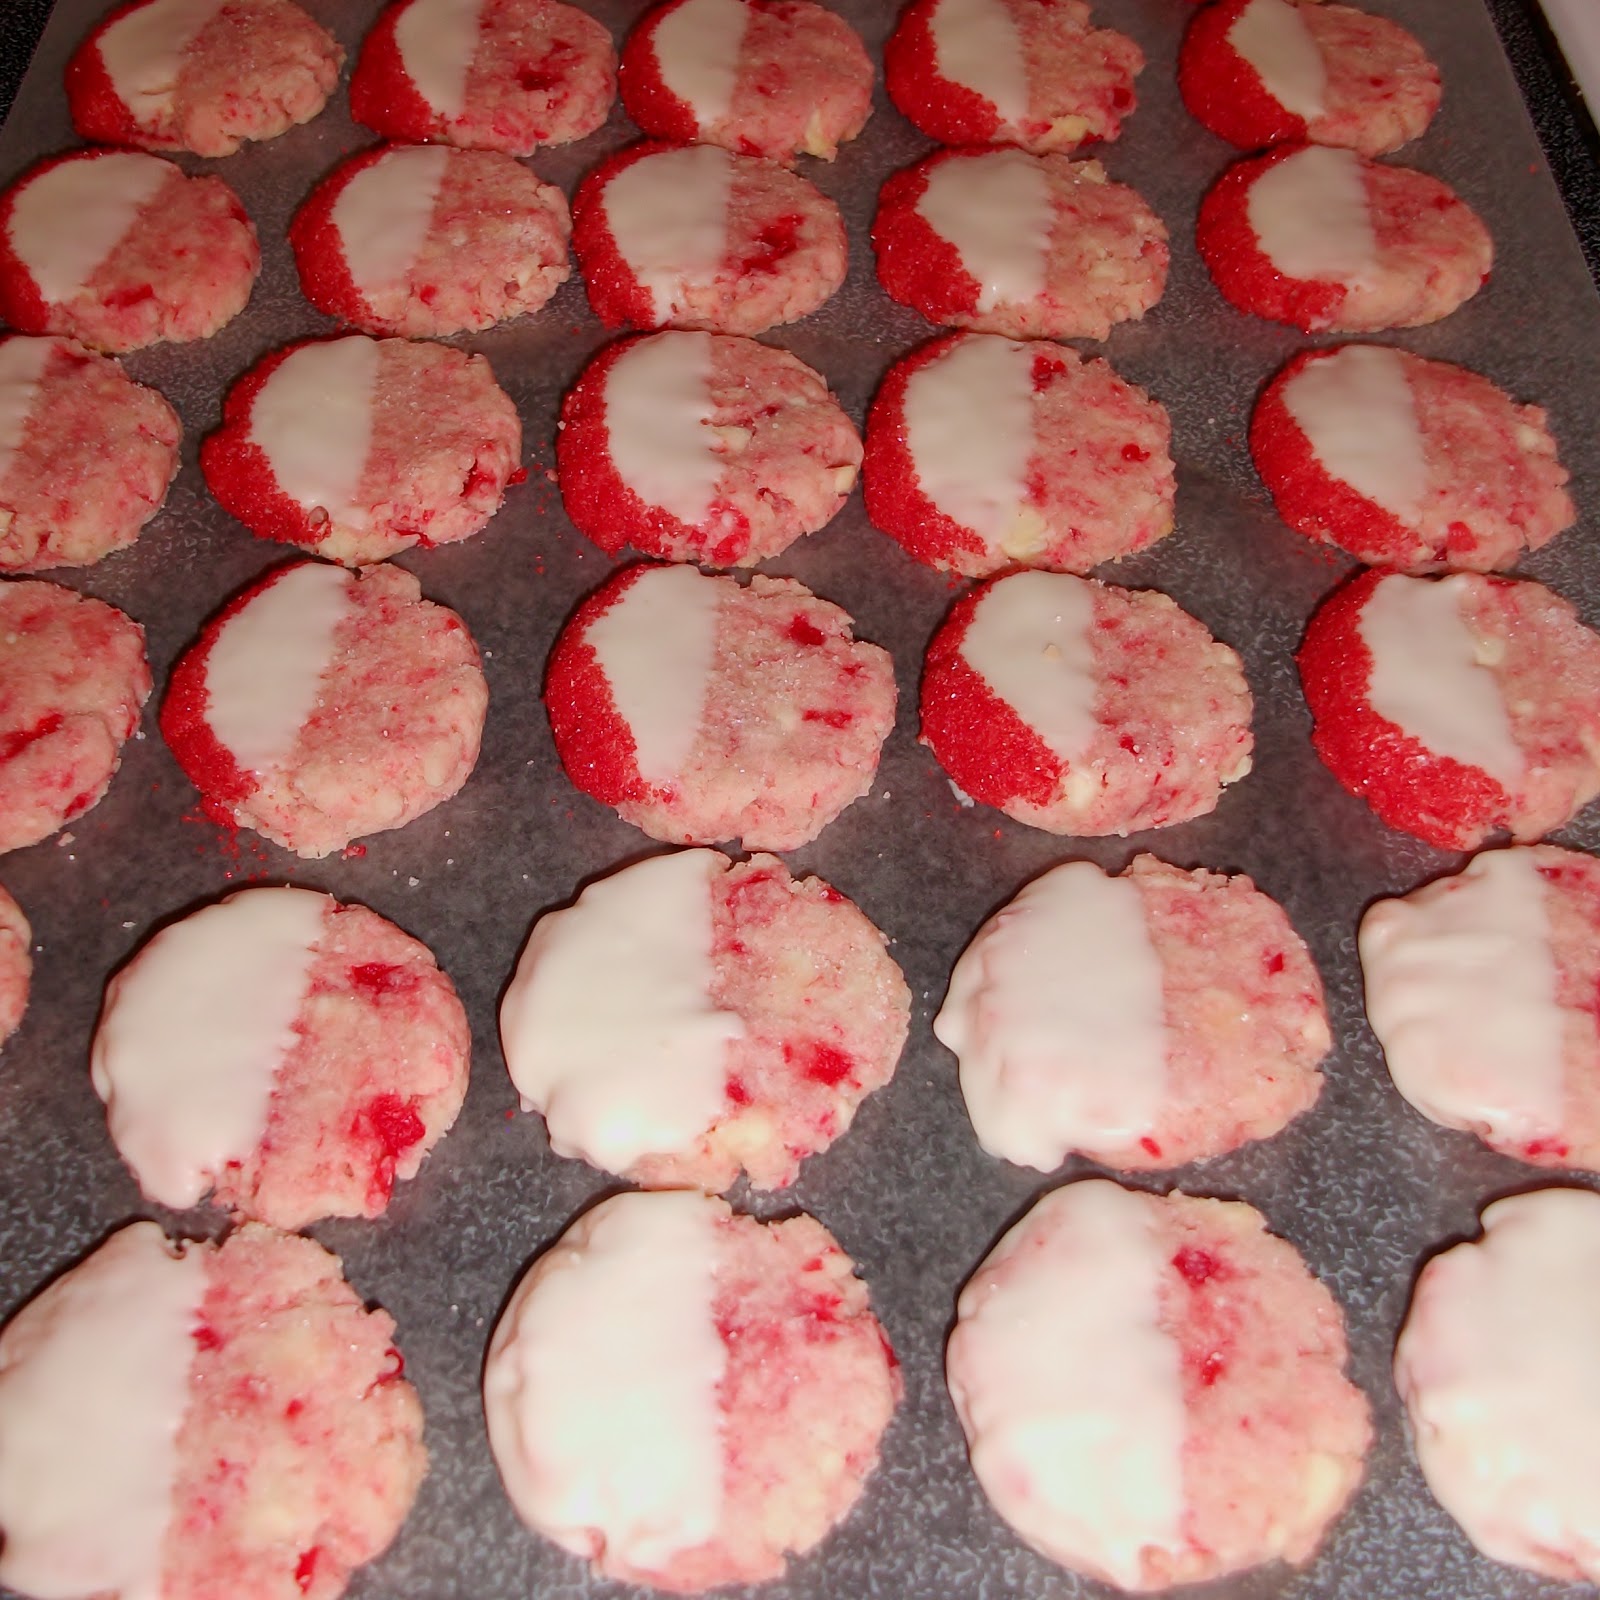
White Chocolate Cherry Shortbread Cookies - Delicious combo, and so pretty.

Better-Than-Mounds Bars - I always have to include something coconutty for the coconut lovers on both sides of my family and these never disappoint!

Stay tuned for recipes to come!

Hugs and cookies,

Amanda

Thursday, January 10, 2013

Hot Cocoa Cookies

I love hot chocolate. It's my winter indulgence. Of course I love fancy, flavored types, but I definitely don't turn my nose up at a Swiss Miss packet! Often, I have more cocoa on my hands than I know what to do with since I'm the only one in the house who drinks it, so I was excited to find a way to use a couple packets for something other than drinking.

For this recipe, I used a combination of these cookies and these cookies, and added a little spin of my own by rolling the cookies in hot cocoa/powdered sugar before baking. They were a hit in our household - Dusty loved them, and the boys kept asking for them . . . It probably doesn't hurt that there's half a marshmallow right on top! The cookies are soft, chewy, and fudgy and sure to please a chocolate-lover. I hope you like them as much as we do!

Hot Cocoa Cookies
1 pkg. brownie mix (dry)
1 1/4 c. flour
1/4 c. brown sugar
1/2 c. butter, melted
2 eggs
2 Tbls water
2 packets hot cocoa mix
1/4 c. powdered sugar
large marshmallows (about 10)
chocolate bars (probably 2 or 3; cut into about 1 inch pieces)
1. Mix together brownie mix, flour, sugar, butter, eggs, and water until a stiff dough forms. Refrigerate 2 hours.
2. Preheat oven to 350, and line a baking sheet with parchment paper.
3. Mix together hot cocoa mix and powdered sugar. Drop dough by heaping Tbls. into mixture and roll until covered. Place on prepared baking sheet. Bake 10 minutes.
4. Meanwhile, cut each marshmallow in half, and stick a piece of chocolate on the bottoms. When cookies come out of the oven, gently press marshmallow/chocolate into the center and continue baking 4-5 minutes.
5. Eat warm for an ooey-gooey treat, or allow to cool.


Hugs and cookies,

Amanda

Saturday, December 22, 2012

12 Days of Goodies: Day 11 - Better-Than-Mounds Bars

Usually during my Christmas baking I make chocolate dipped coconut macaroons, but this year I didn't feel like scooping out the individual cookies, baking them, then dipping them. However, my youngest brother loves those cookies, so I knew I still wanted to make something with chocolate and coconut.

These bars are easy. They are chewy. They have chocolate and coconut. They. Are. Amazingly delicious. They're one of those bars that I could keep eating and eating despite how full I feel. Dangerous, I know. But seriously, they come together so quickly and are so yummy - you won't be disappointed.

Better-Than-Mounds Bars (original recipe can be found here)
1 3/4 c. graham cracker crumbs
1/2 c. butter, melted
1/3 c. sugar
7 oz. sweetened flaked coconut
14 oz. can sweetened condensed milk
1 1/2-2 c. semi-sweet chocolate chips (depending on how chocolate-y you want them)
1 Tbls. peanut butter
1. Preheat oven to 350 degrees, line a 9x13 pan with foil, and grease it.
2. With a fork, mix together graham cracker crumbs, butter, and sugar. Evenly and firmly press into pan. Bake 10 minutes.
3. Meanwhile, stir together coconut and condensed milk. Carefully spread over baked crust, and place back in the oven to bake 15 minutes. Allow to cool.
4. Melt chocolate chips and peanut butter together, and spread over cooled bars. Place in the fridge for 1/2 an hour to set up.


Hugs and cookies,

Amanda

Friday, December 21, 2012

12 Days of Goodies: Day 9 - Toffee Apple Pie Cookies

These cookies use the warm spices of the season (like cinnamon and nutmeg), but kick it up by adding in graham cracker crumbs, chopped apples, and toffee. They're soft and just sweet enough with the white chocolate drizzle on top (you can certainly leave that off). They're traditional enough with the flavors, but those extra ones make them special for the season. Hope you like them!

Toffee Apple Pie Cookies (original recipe can be found here)
1/2 c. softened butter
1/2 c. shortening
1 c. brown sugar
1/2 c. sugar
2 eggs
2 tsp. vanilla
2 tsp. baking powder
1 tsp. salt
2 2/3 c. flour
1 c. graham cracker crumbs
1 tsp. cinnamon
1/2 tsp. nutmeg
1 c. finely chopped apple (I used Granny Smith)
1 c. toffee pieces (not chocolate covered)
1/2 c. white chocolate chips
1 tsp. vegetable oil
1. Preheat oven to 350 degrees, and line baking sheets with parchment paper.
2. Cream together butter, shortening, and sugars.
3. Add in eggs, vanilla, baking powder, salt, cinnamon, and nutmeg, and beat again.
4. Stir in flour and graham cracker crumbs until just combined, then stir in the apple and toffee pieces.
5. Drop dough by Tbls. onto prepared sheets and bake 10-12 minutes. Allow to cool.
6. Melt white chocolate with vegetable oil, and use a fork to drizzle over the cookies. Allow the chocolate to harden before storing.


Hugs and cookies,

Amanda

Wednesday, December 19, 2012

12 Days of Goodies: Day 8 - Salted Caramel Chocolate Chip Cookie Bars

The name is a mouthful, but it's totally worth it for these cookie bars. They're so gooey and delicious it's almost impossible to stop eating them. Thanks to Brown Eyed Baker for the recipe idea!

I used my own chocolate chip cookie dough recipe, and since I was using a 9x13 pan I used an entire 14 oz. bag of caramels instead of 11 oz. as the original recipe calls for in an 8x8 pan. I thought there was still plenty of caramel flavor and texture without fully doubling the caramel called for, but feel free to use 22 oz. instead of 14, if you want. Also, to make this recipe even easier, you can use store-bought cookie dough. I'd use two packages, one for the bottom crust, one for the top, if you're using a 9x13 pan.

I think this recipe would be really versatile, too - it would be excellent with peanut butter cookie dough, or oatmeal chocolate chip, or even sugar cookie dough. I love recipes that I can easily change up for a delicious treat!

Salted Caramel Chocolate Chip Cookie Bars
1 c. melted butter
1 c. brown sugar
1 c. sugar
2 eggs
2 tsp. vanilla
1 tsp. salt
1 tsp. baking soda
3 1/2 c. flour
1 1/2-2 c. chocolate chips
14 oz. bag of caramels, unwrapped
2 Tbls. milk or cream
1. Preheat oven to 325 degrees, and grease a 9x13 pan.
2. Stir together melted butter, and both sugars until smooth.
3. Stir in eggs, vanilla, salt, and soda.
4. Stir in flour until just combined, and then stir in the chocolate chips.
5. Spread half the dough in the prepared pan.
6. Melt together caramels and milk until smooth. Pour over dough in the pan.
7. Use the rest of the cookie dough to spread over the top of the caramel, doing your best to make sure all the caramel is covered.
8. Bake about 45 minutes, until the edges are golden brown, and the top is lightly browned. Allow to come to room temperature, then refrigerate for about half an hour before cutting.


Hugs and cookies,

Amanda

Tuesday, December 18, 2012

12 Days of Goodies Day 7: Peanut Butter Kiss Cookies in Reverse

One of my favorite cookies is the peanut butter cookies that are rolled in sugar and have a Hershey's kiss pressed into the center or a chocolate star. For probably the gazillionth time, I love the peanut butter and chocolate combination. These cookies were a fun twist on that traditional cookie.

The dough is chocolate with a hint of peanut butter, and originally you were supposed to form the dough around a small ball of peanut butter/powdered sugar. Well, I didn't feel like being quite that putzy with it, so I rolled the chocolate dough in sugar, baked the cookies, and when they came out of the oven I pressed my thumb into the center and filled it with the peanut butter filling. The result was delicious, and I have a feeling this will be a popular cookie with my hubby and sibs, who all seem to love chocolate/peanut butter, too!

You can always use a peanut butter kiss to press into the center, too, or any other small piece of chocolate you think would be yummy.

Chocolate Peanut Butter Surprise Cookies (original recipe can be found here)
1/2 c. butter, softened
1/2 c. sugar, plus extra for rolling
1/2 c. brown sugar
1 c. peanut butter, divided
1 tsp. vanilla
1 egg
1/2 tsp. baking soda
1/4 tsp. salt
1/2 c. unsweetened cocoa powder
1 1/2 c. flour
1/2 c. powdered sugar
2-3 Tbls. milk
1. Preheat oven to 350 degrees and line a baking sheet with parchment paper.
2. Cream together butter, both sugars, and 1/2 c. peanut butter.
3. Add vanilla, egg, baking soda, and salt, and beat again.
4. Slowly stir in cocoa powder and flour.
5. Form dough into 1 inch balls and roll in regular sugar. Flatten slightly with the bottom of a glass and bake 7-9 minutes.
6. Immediately after removing them from the oven, make an indentation in the center of the cookie with your thumb (careful, they're hot!) or the handle of a wooden spoon. Allow to cool.
7. Beat together powdered sugar, remaining 1/2 c. peanut butter, and milk until smooth. This will be thick. Pipe or spoon a blob into the center of each cookie and press slightly with your finger to make it smooth.

Hugs and cookies,

Amanda


Monday, December 17, 2012

12 Days of Goodies: Day 6 - White Chocolate Cherry Shortbread

This recipe was "pinned" as one of the best Christmas cookie exchange recipes on Pinterest, so I figured I better give it a whirl. It didn't hurt that the name made them sound delicious, and they're such a pretty color!

When I made the dough, it was really crumbly at first but came together a little better after some kneading. I was worried that the cookies would just be too crumbly and fall apart, but that wasn't the case at all. They stayed nicely formed while they baked, and were actually quite sturdy! They'd make a great traveling cookie, and they taste amazing; it's nice to have a cookie that's a little out of the ordinary and this one is exactly that.

White Chocolate Cherry Shortbread (original recipe can be found here)
1/2 c. maraschino cherries, drained and finely chopped
2 1/2 c. flour
1/2 c. sugar
1 c. cold butter
1/2 tsp. almond extract
12 ounces white chocolate chips (chop up 2/3 c. to use in the dough)
1-2 tsp. vegetable oil
sprinkles or edible glitter, optional
1. Preheat oven to 325 and line a cookie sheet with parchment paper.
2. Mix together flour and sugar, then cut in butter with a pastry blender until fine crumbs form.
3. Stir in almond extract, chopped cherries and chopped white chocolate chips. Knead dough until it comes together in a ball.
4. Drop dough by Tbls. onto prepared sheet, and flatten using the bottom of a glass dipped in sugar.
5. Bake for 10-12 minutes, until cookies are set in the center. Allow to cool.
6. Melt remaining chocolate chips and vegetable oil until smooth. Dip half the cookie in chocolate and the edge in sprinkles, if desired. Set on wax paper to cool and set.


Hugs and cookies,
Amanda

Saturday, December 15, 2012

12 Days of Goodies: Day 5 Super-Soft Ginger Cookies Done Two Ways

Ginger cookies tend to be a Christmas cookie staple, but many of them can leave you underwhelmed as far as flavor and texture go. Not so with these cookies - they are soooo soft, and the flavor is deep and rich from the combination of molasses, cinnamon, and ginger. If you think you don't like ginger cookies, I highly recommend giving these a try.

Half of the cookies I rolled in sugar before baking, and the other half I frosted with vanilla frosting after they had cooled. They're delicious both ways, and the recipe makes a lot (I got 80 cookies!) which is a plus if you want to hand them out to family and friends . . . or if you're doing 11 cookie trays, like I am. :)

Soft Ginger Cookies (recipe from Betty Crocker Cookbook)
1 c. sugar
3/4 c. sour cream
1 c. butter, softened
1/2 c. molasses
1 egg
1 1/2 tsp. baking soda
1 tsp. cinnamon
1 tsp. ginger
1/2 tsp. salt

3 c. flour

1. Preheat oven to 375 degrees and line a cookie sheet with parchment paper.
2. In a large bowl, beat sugar and butter until creamy, about 2 minutes. Scrape down bowl.
3. Add sour cream, molasses, egg, baking soda, cinnamon, ginger, and salt, and beat again, 3-4 minutes.
4. Stir in flour until just combined.
5. Drop dough by Tbls onto prepared cookie sheets. Roll in sugar if desired. Bake 9-11 minutes, or until cookies are set. Let cool on pan for a couple minutes, then move to cooling racks to cool completely.
*I used my basic buttercream recipe to frost my cookies, but use whatever you like best!

Vanilla Buttercream
1/2 c. butter
1/2 c. shortening
4 c. powdered sugar
1 Tbls. vanilla
2-3 Tbls. milk
1. Beat together butter and shortening until light and fluffy, 3 minutes.
2. Slowly add powdered sugar and beat on med.-high speed for 5 minutes.
3. Beat in vanilla and milk.


Hugs and cookies,

Amanda

Friday, December 14, 2012

12 Days of Goodies: Day 4 - Mint Meringue Kisses

You can't do holiday treats without including something with peppermint - it captures the season like few other flavors can. Peppermint isn't usually my favorite flavoring, but when it's mixed with chocolate it takes on a whole different flavor. 

The wonderful thing about these cookies is how absolutely light and airy they are. They're like crisp puffs of air with a light peppermint taste complemented by the light dip in chocolate. You can drizzle chocolate over the tops if you prefer, instead of dipping; and, if you don't want to pipe the meringues, you can certainly just drop them by Tbls. onto the baking sheet and they'll be just as lovely and delicious.

Mint Meringue Kisses (original recipe can be found here)
4 egg whites, at room temperature
1/2 tsp. cream of tartar
1/2 tsp. salt
1 1/3 c. sugar
1/4 tsp. peppermint extract
6-7 drops of green food coloring
1 c. semi-sweet chocolate chips
1 tsp. vegetable oil
1. Preheat oven to 225 degrees, and line 2 baking sheets with parchment paper - do not grease.
2. Combine egg whites, cream of tartar, and salt in a mixer and use the whisk attachment to whisk on high until soft peaks form, 2-3 minutes.
3. Add sugar 1 Tbls. at a time, and continue beating until stiff peaks form, another 2-3 minutes.
4. Beat in peppermint extract and food coloring.
5. Using a large star tip, pipe 1 inch stars on the parchment paper, leaving about 1 inch between each one.
6. Bake for 1 hour, turn the oven off, and leave the pans in the oven for another hour until they're cool and dry.
7. Melt together chocolate chips and vegetable oil, and drizzle over top of meringues, or dip tops in it. Allow chocolate to cool and set.


Hugs and cookies,
Amanda

Wednesday, December 12, 2012

12 Days of Goodies: Day 2 - Buttery Orange Cookies with a Chocolate Drizzle

These tender cookies are sure to be a hit on your holiday cookie tray. Unlike some cookies, these aren't overly sweet. They have a hint of orange, and the drizzle of chocolate on the top hits just the right note for sweetness and flavor combination. This was a new recipe for me this year, and it's one I'll be sure to return to and use again.

I love the combination of chocolate and orange (i.e. those chocolate oranges that you smash and then eat the segments), but if you're not a fan, feel free to leave out the orange zest and substitute almond or vanilla extract. Even peppermint extract might be a nice touch! I used milk chocolate for the drizzle, but if you like semi-sweet or bittersweet, or even white chocolate, go with it! You can adapt this cookie many different ways to suit your tastes.

Buttery Orange Cookies with a Chocolate Drizzle (recipe slightly adapted from Taste of Home Christmas Cookies 2012)
1 c. softened butter
1/2 c. powdered sugar
1 tsp. orange zest
1 tsp. orange extract
1/4 tsp. salt
2 c. flour
1/2 c. sugar
1/2-3/4 c. chocolate chips (I used milk chocolate, but you can use your favorite)
1. Preheat oven to 350 and line baking sheets with parchment paper.
2. Cream butter and powdered sugar until light and fluffy, 2-3 minutes.
3. Beat in zest, extract and salt.
4. Add flour and mix until combined - this is a stiff dough.
5. Drop dough by Tbls. onto prepared baking sheet. Dip tops of dough in sugar, and flatten slightly with the bottom of a glass.
6. Bake cookies 10-12 minutes, or just until set - they shouldn't be brown.
7. Once cookies have cooled, melt chocolate chips, and use a fork to drizzle the chocolate over the tops of the cookies. Alternately, you could dip half the cookie in chocolate, although you'll need more chocolate chips for this.
8. Place in the fridge or freezer until chocolate sets and hardens - 20-30 minutes.

Hugs and cookies,

Amanda

Wednesday, October 17, 2012

Peanut Butter Snickers Bars

Sometimes I have a great idea for a recipe and am so excited to make it that I don't check the ingredients I have on hand first. Sometimes it's a disaster. Other times, it turns into a scrumptious treat that becomes a family favorite! The latter is what happened with this recipe, thankfully.

I had a craving for those little peanut butter cookies that have a Snickers hidden on the inside, but didn't feel like going through the work of rolling each individual ball. So, I went to my go-to, all-time-favorite, Peanut Butter Cookie recipe. I thought I would just chop up the fun-size Snickers I "knew" we had on hand and stir them into the batter . . . Well, as it turned out there were only 4 left! (I have no idea how that happened - it's like we have an uncontrollable, chocolate-craving, pregnant lady in our house or something.) Clearly 4 measly little pieces would not be enough for an entire pan of bars.

I got to thinking - what else did I have on hand? Milk chocolate chips? Check. Peanuts? Check. Caramel bits? Check. Sounded like Snickers to me! I stirred those into the cookie dough, spread it in the pan, topped it with what Snickers I did have and let it bake. Ooo-la-la - chewy, crunchy, deliciousness. Sometimes the best recipes come out of the blue!
*If you don't have those additional ingredients, you can certainly follow my original plan and just stir chopped Snickers into the dough.

Peanut Butter Snickers Bars
2 1/2 c. flour
1 tsp. salt
1/2 tsp. baking soda
1/2 tsp. baking powder
1 c. (2 sticks) softened butter
1 c. light brown sugar
1 c. sugar
1 c. peanut butter (we had creamy on hand, so that's what I used)
2 tsp. vanilla
2 large eggs
3/4 c. peanuts, chopped
1 c. caramel bits
1 1/2 c. milk chocolate chips
4 (or more) fun-size Snickers, chopped
1/4 c. chocolate chips (for drizzling, if desired)
1. Preheat oven to 350. Grease a 9x13 pan and set aside.
2. Beat butter with sugars until creamy - 2 minutes. Scrape down sides of bowl.
3. Add peanut butter, vanilla, eggs, baking powder, baking soda, and salt and beat again.
4. Stir in flour until almost combined.
5. Add peanuts, caramel bits, and chocolate chips, and mix until just combined.
6. Spread evenly in pan and sprinkle with chopped Snickers. Bake 25-28 minutes, or until light golden brown on top.
7. Melt 1/4 c. chocolate chips and use a fork, spoon, or plastic baggie to drizzle over the top of the bars. Allow to cool before cutting.


Monday, September 24, 2012

Cream Cheese M&M Sugar Cookies

Let me start by saying that over the years I've come to a new appreciation for sugar cookies. Maybe it's because I've come across a few truly delicious recipes that don't even need frosting to make them delicious. When I was growing up, I loved eating sugar cookie dough, but was usually left pretty un-enthused after they were baked. Not the case anymore! My favorite cut-out recipe uses cream cheese, and my favorite drop recipe uses sour cream. The addition of those simple ingredients takes them over the top and keeps you coming back to eat cookie after cookie after cookie . . .

However, this recipe is neither of those, but oh is it good! There's a little bit of cream cheese in the dough, which adds a hint of tang once they're baked up. You don't have to use the M&Ms if you don't want to; these are seriously scrumptious without. You roll the dough in sugar before baking them, which creates this thin crust of sugary goodness. Then, the inside of the cookie is so deliciously chewy as to be pretty much indescribable. One of my favorite things about these cookies is their texture - wonderful.

You could certainly roll them in colored sugar to make them more festive around Christmas, Thanksgiving, Valentine's Day, etc. Or, try mixing in different things - white chocolate chips, toffee pieces, crushed candy canes, etc. The possibilities are endless!

Cream Cheese M&M Sugar Cookies (original recipe can be found here)
2 oz. cream cheese, softened
1 1/2 c. plus 1/3 c. sugar
6 Tbls. butter, melted
1/3 c. vegetable oil
1 egg
1 Tbls. milk
2 tsp. vanilla
1 tsp. baking powder
1/2 tsp. baking soda
1/2 tsp. salt
2 1/4 c. flour
1 1/4 c. M&Ms
1. Beat cream cheese and 1 1/2 c. sugar on medium speed until light and fluffy - 3 minutes.
2. Add butter and oil and beat again on medium speed 1 minute. Scrape down bowl.
3. Add egg, milk, vanilla, baking powder, baking soda, and salt and mix until everything comes together and is smooth and creamy, 2 minutes.
4. Stir in flour until mostly combined, then stir in M&Ms until everything is just combined. Don't overmix.
5. Refrigerate dough 1-2 hours.
6. Preheat oven to 350 and roll Tbls of dough in 1/3 c. sugar. Place on greased baking sheet, flatten slightly with the bottom of a glass, and bake 10-14 minutes. Bottoms should look light golden brown.


Hugs and cookies,
Amanda

Friday, September 14, 2012

Butterscotch Pudding Triple Chip Cookies

I am a recipe-a-holic. I can't help myself. If I see a recipe for something that looks and sounds delicious (usually some type of cake/cookie/bar) I have to save it. I do that even if I already have a similar recipe that I love. Apparently the adage "If it ain't broke, don't fix it" doesn't apply to my recipe collection.

So . . . 

Even though I have this Chocolate Chip Cookie recipe that's my all-time favorite, I couldn't resist trying these Butterscotch Pudding Triple Chip Cookies. And oh am I glad I did!

They're so good. They're especially good if you love soft, cake-like cookies. The butterscotch pudding keeps them so, so soft, and gives them a flavor different enough from traditional chocolate chip cookies to make them special. And you can't go wrong with three different types of chips in there, either! 

They don't take long to whip together and are sturdy enough to travel if you're driving in the car or want to take them to a friend. Yummmmm . . .

Butterscotch Pudding Triple Chip Cookies (recipe adapted from Two Peas and Their Pod)
1 c. softened butter
3/4 c. brown sugar
1/4 c. sugar
1 pkg. butterscotch instant pudding mix
2 eggs
1 tsp. vanilla
1 tsp. salt
1 tsp. baking soda
3 1/2 c. flour
3/4 c. white chocolate chips
3/4 c. butterscotch chips
3/4 c. semi-sweet chocolate chips
1. Preheat oven to 350 and grease a cookie sheet.
2. Beat together butter, both sugars, and pudding mix until thoroughly combined.
3. Scrape down bowl and beat in eggs, vanilla, salt, and baking soda.
4. Scrape down bowl again, and stir in flour until almost combined.
5. Add all three chips and mix until just combined.
6. Drop by Tbls. onto prepared baking sheet and bake 8-10 minutes, or until light golden brown around the edges.


These are delicious warm out of the oven, but don't worry, they're just as delicious when they're cool!

Hugs and cookies,
Amanda

Wednesday, August 22, 2012

Strawberry White Chocolate Cake Cookies

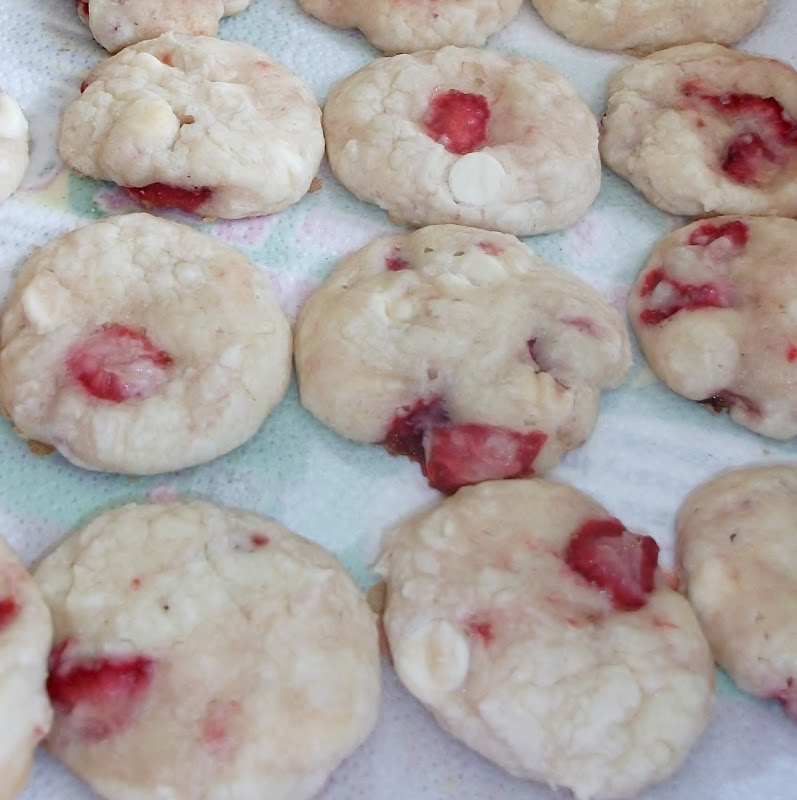
Sometimes, I have an idea in my head for a recipe and it totally disappoints me. Either it's not the consistency I was looking for, the taste is "meh," or it just doesn't grab my attention. If I don't immediately go back for more, it's probably not a recipe I'll make again (unless of course a family member or friend raves about it - then I might make it specifically for them).

Luckily, that wasn't the case with this recipe. These little cookies are so soft, and the fresh strawberries add a hint of tartness that balances out the sweetness of the cookie and chocolate chips. I loved the white chocolate and strawberry, but if you're a fan of milk or dark chocolate, feel free to substitute that. Or, you could use a chocolate cake mix in place of the white cake mix and really change it up. And, if you want an extra kick of strawberry, you could use a strawberry cake mix instead of white. But, the recipe, as-is, is really delicious. I wanted to use almond extract, but apparently I ran out (hate when that happens!), so I used vanilla instead, which was still tasty. There are probably a hundred different ways to change up this recipe, so have fun with it!

Strawberry White Chocolate Cake Cookies
1 box white cake mix
1/3 c. vegetable oil
2 eggs
1 tsp. vanilla
1 c. chopped, fresh strawberries
3/4 c. white chocolate chips
1. Preheat oven to 350 degrees.
2. In a large bowl, mix together cake mix, oil, eggs, and vanilla, by hand. Don't do this with a mixer or you'll overmix the dough and get a weird cookie texture.
3. Stir in the chocolate chips until just combined, then gently fold in the strawberries. Don't worry about distributing them evenly. You don't want to overwork the dough or it'll turn pink!
4. Drop by tablespoon onto greased baking sheet and bake about 10-12 minutes, or until cookies look set in the middle and the bottoms are light brown. Allow to cool on the pan for a few minutes before moving to a cooling rack.
*These are very soft cookies, so make sure you use a cookie spatula to remove them from the pan or they might fall apart before they've cooled. I also think they're best when eaten within a day or two.


Hugs and cookies,

Amanda