Wednesday, August 22, 2012

Strawberry White Chocolate Cake Cookies

Sometimes, I have an idea in my head for a recipe and it totally disappoints me. Either it's not the consistency I was looking for, the taste is "meh," or it just doesn't grab my attention. If I don't immediately go back for more, it's probably not a recipe I'll make again (unless of course a family member or friend raves about it - then I might make it specifically for them).

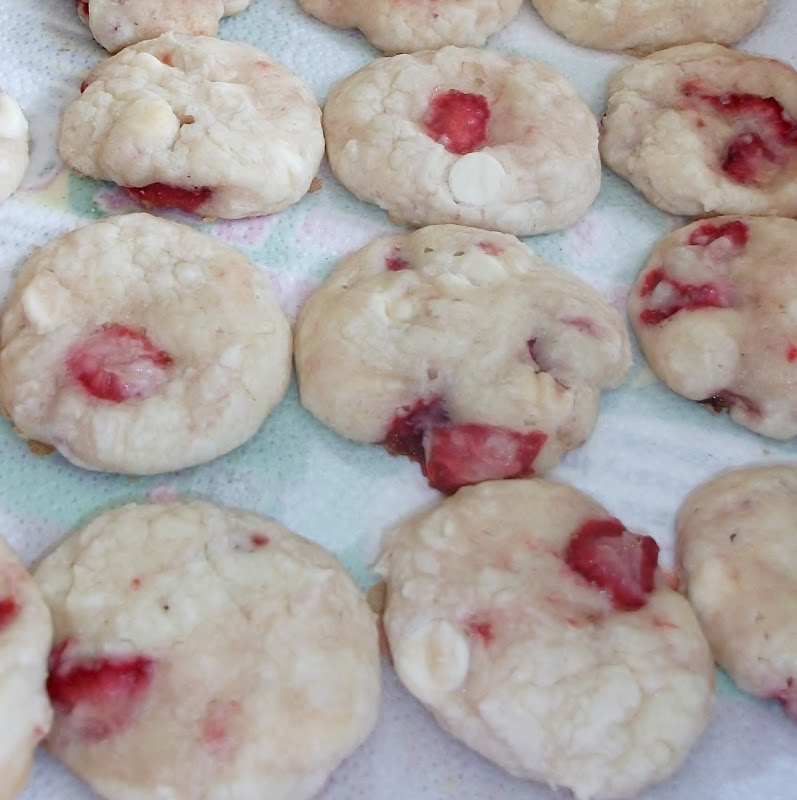
Luckily, that wasn't the case with this recipe. These little cookies are so soft, and the fresh strawberries add a hint of tartness that balances out the sweetness of the cookie and chocolate chips. I loved the white chocolate and strawberry, but if you're a fan of milk or dark chocolate, feel free to substitute that. Or, you could use a chocolate cake mix in place of the white cake mix and really change it up. And, if you want an extra kick of strawberry, you could use a strawberry cake mix instead of white. But, the recipe, as-is, is really delicious. I wanted to use almond extract, but apparently I ran out (hate when that happens!), so I used vanilla instead, which was still tasty. There are probably a hundred different ways to change up this recipe, so have fun with it!

Strawberry White Chocolate Cake Cookies
1 box white cake mix
1/3 c. vegetable oil
2 eggs
1 tsp. vanilla
1 c. chopped, fresh strawberries
3/4 c. white chocolate chips
1. Preheat oven to 350 degrees.
2. In a large bowl, mix together cake mix, oil, eggs, and vanilla, by hand. Don't do this with a mixer or you'll overmix the dough and get a weird cookie texture.
3. Stir in the chocolate chips until just combined, then gently fold in the strawberries. Don't worry about distributing them evenly. You don't want to overwork the dough or it'll turn pink!
4. Drop by tablespoon onto greased baking sheet and bake about 10-12 minutes, or until cookies look set in the middle and the bottoms are light brown. Allow to cool on the pan for a few minutes before moving to a cooling rack.
*These are very soft cookies, so make sure you use a cookie spatula to remove them from the pan or they might fall apart before they've cooled. I also think they're best when eaten within a day or two.


Hugs and cookies,

Amanda

Monday, August 20, 2012

Toddler/Kid Art

Remember when I made this piece of crayon art? It was so fun and easy to do, but I bought the canvas in a 3-pack, so I've had 2 pieces sitting around staring me in the face for a long time now. I knew what I wanted to do with them, but hadn't gotten around to doing it . . . Partly because I was a little intimidated and nervous. It involves painting. With kids. Enough said.

I wanted to tape the boys' names on the canvas, then have them finger-paint all over it. Once it dried, I could remove the tape and their names would show up white against the colored finger-painting! Such a cute idea. And, I saw a recipe for homemade finger=paints on Pinterest which made the idea even more appealing.

I had the idea in my head that I would make four colors, and the boys would each get to use 2 colors: red/yellow or green/blue. Well, it didn't work quite as planned because Aiden's basically ended up orange, and Asher's is kind of teal-ish. Both cute, but I mistakenly thought there would be some separation of colors. Silly me. :) As my husband said, it just makes it look more like kids did it - which was the point, right? Right.

So when Dusty was at work this week I stripped the boys down to their diapers (actually Asher was naked because we're working on potty training hard core . . . more on that later) and let them have at it. Needless to say, it was a mess; but it was also really fun for all of us. Another great part was that even when some of the paint (inevitably) got on the table, it wiped up really easily. And the boys were plopped straight into the bathtub when they were done! Asher and Aiden (and Mommy!) were pretty excited to show Daddy what they did that day, and now we have some more fun art to put in their room or play area!

Supplies
canvas
tape
finger paints
1. Tape onto the canvas the word or name you'd like to use. Make sure to press out any bubbles and stick it on tight.
2. Finger paint all over canvas.
3. Allow to dry completely and delicately peel off tape.
4. Ta-da!
*You could also outline the letters with black marker before peeling them off, but I chose not to.

Homemade Finger Paints (original can be found here)
3 Tbls. sugar
1/2 tsp. salt
1/2 c. cornstarch
2 c. cold water
food coloring of your choice
1. Place all ingredients except food coloring in a saucepan and warm over med.-low heat until mixture thickens. Whisk while you're doing this to avoid lumps. (Mine took 5-7 minutes.)
2. Allow to cool and color as desired. (I ended up using about 20 drops for each color, but next time I might use even more to make the colors more vibrant.)
Pausing for a pic - Aiden is all over that canvas!
Look at that concentration!
Total mess!
Me: "Okay, that's enough-time for baths!"
Aiden's finished product
Asher's finished product

Friday, August 17, 2012

Cinnamon Swirl Whole Wheat Banana Bread

If you love banana bread as much as I do, (basically in any shape, size or combination) I think you'll really love this recipe. It's even healthy - no oil, and all whole wheat flour! But don't worry, the taste is still sensational. You definitely won't feel as though you're eating a healthified banana bread. I could probably eat half a loaf in one sitting . . . Although, I refrained from doing that, at least until I got pictures taken. :) And the boys love it - it's great for an easy breakfast or afternoon snack!

Cinnamon Swirl Whole-Wheat Banana Bread
3 very ripe bananas, mashed up (a heaping cup)
1/3 c. unsweetened applesauce
2/3 c. sugar
1 egg
1 tsp. vanilla
1 tsp. baking soda
1/2 tsp. salt
1 1/2 c. white whole wheat flour (feel free to sub. regular whole wheat flour, or white flour if you'd like)
Cinnamon Swirl
1/2 Tbls. cinnamon
1/4 c. sugar
1. Preheat oven to 350. Grease and flour a 9x5 inch loaf pan and set aside.
2. Thoroughly mix bananas, applesauce, sugar, egg, vanilla, soda, and salt.
3. Fold in flour until just combined - your batter should still have lumps in it.
4. Mix together cinnamon swirl ingredients.
5. Spread half the batter in your prepared pan, and sprinkle evenly with your cinnamon-sugar mixture. (If you want, you can reserve some and sprinkle it over the top before you bake it.) Evenly spread the remaining batter over the cinnamon-sugar.
6. Bake 50-60 minutes, or until a toothpick inserted in the middle comes out clean.
Make a double batch and freeze one or give to a friend!


Hugs and cookies,

Amanda


Wednesday, August 15, 2012

How I Broke the News of Baby #3 to My Hubby

Baby #3 was semi-planned, but came a lot more quickly than we were expecting. So one Saturday morning we were all on the main floor of the house picking/cleaning up and waiting for my sister and brother-in-law who were coming later that afternoon.

I snuck a pregnancy test in while Dusty was doing dishes, and . . . Remember this DIY gift I gave him for Valentine's Day?

Well, I made use of it to tell him I was pregnant:


I hastily scribbled it on there and waited until he noticed. I think his exact response was, "NUH-UH! Are you serious?!" He was elated and disbelieving at the same time - neither of us expected it. I definitely had fun breaking the news to him, but it took some patience because I wanted to blurt it out instead of waiting for him to notice I had written something different on the frame. Luckily, I didn't have to wait too long. ;)

How have you broken baby news to your partner?

Tuesday, August 14, 2012

Caramel Toffee Chocolate Chip Bars with Caramel Frosting

I haven't been doing a ton of baking lately (I don't even feel like myself!) because we've been traveling a lot for vacations, and weddings and things, but I finally got back in the kitchen the other day to bake up these gems. The bars themselves were really good, even without the frosting - the frosting enhances that caramel flavor and gives them more sweetness. Warning: If you don't like your bars overly sweet, leave off the frosting. (Although, keep the recipe on the hand because this frosting would be great on a cake . . . or brownies!)

The bars come together really quickly and stay nice and moist for days as long as you keep them covered. I was really happy with the way the caramel frosting turned out, too, because it's something I've wanted to try for quite a while, but have always been a little intimidated. Many of the recipes either require a candy thermometer, or say "Use immediately before it hardens!" That always scares me off because I start to think, "Well, what if I don't use it in time?! Will I have to throw it out? What a waste of time and ingredients!" Well, this recipe didn't require a thermometer, and it didn't come with a warning either. Best of all? It's delicious. I'll definitely use it again.

Caramel Toffee Chocolate Chip Bars (slightly adapted from here)
1 pkg caramel cake mix, dry
2 eggs
1/4 c. water
1/4 c. brown sugar
1/4 c. butter, softened
1 c. chocolate chips
1/2 c. toffee pieces
1. Preheat oven to 375, and grease a 9x13 pan.
2. Mix together cake mix, eggs, water, sugar, and butter until dough comes together; 1-2 minutes.
3. Stir in chocolate chips and toffee pieces.
4. Spread in prepared pan and bake 24-27 minutes, or until golden brown on the top.

Caramel Frosting (from The Cake Mix Doctor Returns)
4 Tbls. butter
1/2 c. brown sugar (if you have both light and dark on hand, use half of each)
1/8 c. milk
1 c. powdered sugar
1/2 tsp. vanilla extract
1. Place butter and brown sugar in a medium saucepan on medium heat. Stir constantly while it comes to a boil.
2. Once boiling, add the milk, stir, and let it return to a boil.
3. Remove from heat and stir in powdered sugar and vanilla.
4. Use frosting while it's still warm; it will set as it cools.


Hugs and cookies,

Amanda

Thursday, August 09, 2012

Strawberry Lemonade Cupcakes

I got to make wedding cupcakes again this summer! It was so much fun working with the bride to figure out flavors, colors, etc., and one that we were both really excited about was this Strawberry Lemonade cupcake. There are a lot of these types of recipes floating around on the internet, and all of them are different. The cupcake recipe I ended up using came from my Betty Crocker cookbook, with a few tweaks of my own; the cream cheese frosting recipe was from Cupcakes! from the Cake Mix Doctor.

The combination of the light, moist, lemon cupcake with a not-too-sweet strawberry cream cheese frosting is  amazing. In fact, one of my sisters said it was the best cupcake she'd ever eaten! I'll put that compliment in the books. ;) The cupcakes themselves are very tender, yet they hold up nicely freezing and traveling; the lemon flavor is just the right amount - it doesn't slam your taste buds as soon as you bite into it, but as you chew, the flavor develops in your mouth. And strawberry cream cheese frosting? Enough said.

*On a super-exciting note for me, this cupcake recipe would also make a phenomenal yellow cake. From scratch. I've been searching for years to find one that's moist and flavorful. All the ones I've tried are either too dry, not flavorful, or both of those things. With the few changes I made to the original recipe, this is it! Just make sure you substitute vanilla extract for the lemon and leave out the lemon zest if you just want a yellow cake. I don't think you'll be disappointed.

Lemon Cupcakes (adapted from Betty Crocker's Starlight Yellow Cake)
2 1/4 c. flour
1 1/2 c. sugar
1/2 c. vegetable oil
1 1/4 c. milk
3 1/2 tsp. baking powder
1 tsp. salt
1 tsp. lemon flavoring
3 eggs
zest of one lemon
1. Preheat oven to 350 degrees and line cupcake pans with liners (should get between 24-28).
2. In a large mixing bowl, beat all ingredients on low speed 30 seconds. Scrape down bowl. Beat on med./high speed an additional 3 minutes.
3. Fill cupcake liners 2/3 full, and bake approximately 18-22 minutes, or until cupcakes are light golden brown on top and spring back went gently pressed with your fingers.
4. Allow cupcakes to cool for a few minutes before removing from pan. Let cool completely before frosting.

Strawberry Cream Cheese Frosting (adapted from Cupcakes from the Cake Mix Doctor)
1 8 oz. pkg. cream cheese, softened
1/4 c. butter, softened
4 1/2 c. powdered sugar
1/2 c. mashed, drained strawberries
1/2 tsp. strawberry extract
1. Beat cream cheese and butter on medium speed 1 minute.
2. Add powdered sugar, extract, and strawberries and mix on low 1 minute until combined. Scrape down bowl, and beat again on med./high speed 1 minute more. Add additional powdered sugar to thicken it if needed, or milk, 1 tsp. at a time if you want it a little thinner consistency.


Hugs and cookies,

Amanda

Tuesday, August 07, 2012

Preg-o Cravings? Yep, They're Real

Well, I'm 15 weeks pregnant, and decided to tackle one of those pregnancy topics that seems to be discussed frequently (at least in pregnancy circles) and I think people tend to slightly misconstrue, or at least have some misconceptions about.

The cliche for pregnant women is that we're craving weird things like pickles with ice cream (delicious on their own, but not together). While that may be true for some pregnant women out there, it definitely isn't my experience, and isn't for the many other pregnant friends/acquaintances I've talked to about it. But, I can say the cravings they talk about are real. So here's my experience . . .

So far, all 3 of my pregnancies have been almost identical craving-wise. Here are things that I've craved with every pregnancy:

McDonald's Chicken Nuggets with their BBQ sauce (no other will suffice)
Fries with Cheese Sauce
Cereal (pretty much any kind, but favorites during all 3 pregnancies have been Honey Bunches of Oats with Almonds and Lucky Charms)
Apples
Chips (this gets annoying because one kind looks good, and once I've eaten a handful I don't want any more; so, by the end of the pregnancy we have about 9 partially eaten bags of chips in our pantry)
Oatmeal Raisin Cookie Dough (thankfully I can make it safe without using eggs . . . although that doesn't make it any healthier)
Tuna Salad on Whole Wheat Bread with Dill Pickles (I know this one seems a little more preg-o cliche, but this is one I enjoy even when I'm not pregnant)
Anyone else hungry now?

How do these cravings work? Well, unfortunately, I tend to have a lot of cravings for things even when I'm not pregnant. The difference is that my preg-o self craves salty more than sweet, which is bizarre considering how much I loooooove sweets of any shape and kind. Also, I'm not one to send my hubby out late at night or in the wee morning hours to get me something we don't have on hand. That being said, if I'm craving something, I don't stop craving it until I've had it, no matter how long it takes. It always sounds appetizing, more so than anything else, until I've eaten it.

First trimester cravings are also a little different for me because I'll really want something, but once I've had it I tend to feel nauseous if I think about it afterward. Thankfully, that passes when the second trimester rolls around.

Unfortunately, most of my cravings aren't healthy options, but I do my best to limit myself with the junk food (sometimes an impossible task) and eat healthy to balance them out.

As I said earlier, my experience is not everyone's and I'm sure there are pregnant women out there right now dipping pickles in their ice cream . . .

What are your pregnancy cravings/experiences, or just thoughts on the matter?